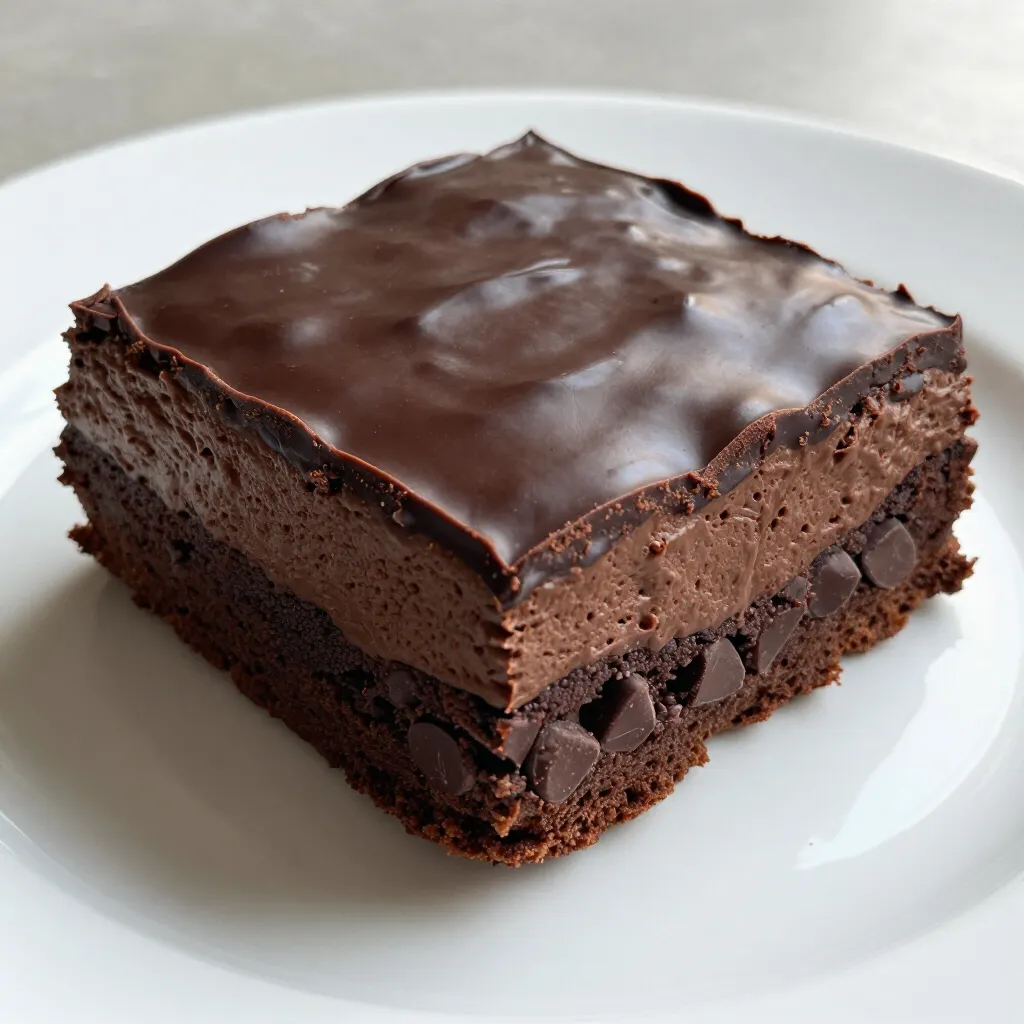
Get ready to indulge in an easy yet delightful treat: Chocolate Mousse Brownies! Combining rich, fudgy brownies with a creamy mousse layer, this recipe is perfect for any occasion. Whether you’re a baking novice or a seasoned pro, I’ll guide you through each step. From gathering essential ingredients to storing your delicious creation, you’ll discover tips and tricks for perfect results. Let’s dive into this chocolatey adventure together!
Why I Love This Recipe
- Decadent Flavor: The combination of rich chocolate brownies and creamy mousse creates an indulgent dessert that’s hard to resist.
- Textural Contrast: The fudgy brownie base paired with the light and airy mousse offers a delightful contrast in every bite.
- Easy to Make: With straightforward steps, this recipe is perfect for bakers of all skill levels, ensuring success every time.
- Perfect for Any Occasion: Whether it’s a celebration or a casual gathering, these brownies are sure to impress your guests.
Ingredients
Essential Ingredients for Chocolate Mousse Brownies
To make these delicious chocolate mousse brownies, you need some key ingredients. Here’s what you’ll need:
– 1 cup unsalted butter, melted
– 1 cup granulated sugar
– 1 cup brown sugar, packed
– 4 large eggs
– 1 teaspoon vanilla extract
– 1 cup all-purpose flour
– 1 cup unsweetened cocoa powder
– 1/2 teaspoon salt
– 1/2 teaspoon baking powder
– 1 cup semi-sweet chocolate chips
– 1 cup heavy cream
– 2 tablespoons powdered sugar
These ingredients create a rich, moist brownie base and a creamy mousse layer.
Optional Ingredients for Enhanced Flavor
You can add optional ingredients to boost the flavor. Here are a few suggestions:
– 1 teaspoon instant coffee granules: This adds depth to the chocolate flavor.
– Nuts like walnuts or pecans: They give a nice crunch.
– A pinch of sea salt on top: It enhances the sweetness.
Feel free to mix and match these options based on your taste!
Substitutions and Alternatives
If you need to make changes, there are great substitutions available. Here are some ideas:
– Use coconut oil instead of butter for a dairy-free option.
– Swap granulated sugar for coconut sugar for a healthier choice.
– Replace heavy cream with coconut cream for a vegan version.
These substitutions still yield delicious brownies with a lovely mousse. Experiment and find what works best for you!

Step-by-Step Instructions
Prepping the Oven and Pan
First, set your oven to 350°F (175°C). This is the perfect heat for baking. Next, get a 9×13 inch baking pan. You can either grease it or line it with parchment paper. Lining makes it easy to lift the brownies out later.
Making the Brownie Base
In a large bowl, mix 1 cup of melted unsalted butter with 1 cup of granulated sugar and 1 cup of brown sugar. Whisk these until they blend well. Then, add 4 large eggs one at a time. Make sure to mix well after each egg. Stir in 1 teaspoon of vanilla extract for that sweet aroma.
In another bowl, sift together 1 cup of all-purpose flour, 1 cup of unsweetened cocoa powder, 1/2 teaspoon of salt, and 1/2 teaspoon of baking powder. Slowly fold this dry mix into the wet ingredients. Be gentle! You don’t want to overmix. When it looks combined, fold in 1 cup of semi-sweet chocolate chips. They will add rich flavor.
Now, pour this brownie batter into your prepared baking pan. Spread it out evenly. Bake for about 25-30 minutes. Use a toothpick to check; it should come out mostly clean, with a few moist crumbs.
Creating the Chocolate Mousse Layer
While the brownies cool, let’s make the mousse. In a mixing bowl, whip 1 cup of heavy cream until it thickens. Gradually add 2 tablespoons of powdered sugar and 1 teaspoon of instant coffee granules if you want a deep flavor. Keep whipping until you see soft peaks form.
Once the brownies have cooled, gently fold the whipped cream into the brownie base. Mix until it looks smooth and creamy. Spread this mousse layer over the brownies. Cover them and chill in the fridge for at least 2 hours. This allows the mousse to set nicely.
When ready to serve, cut the brownies into squares. Enjoy them chilled, and feel free to add whipped cream, chocolate shavings, or fresh berries on top!
Tips & Tricks
How to Achieve the Perfect Brownie Texture
To get the best brownie texture, you need to mix well but not too much. Start by blending the melted butter with both sugars until it looks smooth. When you add the eggs, mix them in one at a time. This helps build a nice structure. Next, sift the dry ingredients together. Folding them into the wet mix should be gentle. Overmixing can make brownies tough. You want them to be soft and chewy. Bake them just right; check with a toothpick for a few moist crumbs.
Whipping the Cream for Mousse Success
Whipping cream is key for a fluffy mousse. Start with cold heavy cream for the best results. Use a clean bowl and beaters to help the cream whip up fast. Whip it until soft peaks form. This means it will hold its shape but still have a light texture. If you add powdered sugar, do it slowly. This helps sweeten the cream without losing air. If using instant coffee, add it while whipping for a deeper flavor.
Chocolate Variations for Better Flavor
You can play with different types of chocolate for extra flavor. Semi-sweet chocolate chips offer a classic taste. Dark chocolate gives a richer flavor, while milk chocolate makes it sweeter. You can also try adding flavored chocolate, like orange or mint. Each choice will change the taste of your brownies. Experimenting lets you find your favorite mix. Just remember to keep the ratios the same for the best results.
Pro Tips
- Use Quality Chocolate: For the best flavor, opt for high-quality semi-sweet chocolate chips. They will enhance the richness of your brownies and mousse.
- Don’t Overmix: When combining the dry ingredients with the wet, mix until just combined. Overmixing can lead to dense brownies instead of the desired fudgy texture.
- Chill the Mousse: Allow the mousse to chill fully for at least 2 hours. This will help it set properly and develop a better flavor and texture.
- Enhance with Toppings: Feel free to add toppings like whipped cream, chocolate shavings, or fresh berries just before serving for added flavor and presentation.
Variations
Adding Flavors (Mint, Coffee, etc.)
You can easily change the taste of your brownies. Adding mint is a fun twist. Just mix in a few drops of mint extract. This gives your brownies a fresh flavor. If you love coffee, add one teaspoon of instant coffee granules. It boosts the chocolate taste. You can also try other flavors like orange zest or almond extract. Each flavor makes your brownies unique.
Alternative Toppings Ideas
Toppings can really enhance your brownies. Try adding whipped cream on top for a light touch. Chocolate shavings look fancy and taste great too. Fresh berries add a nice burst of flavor and color. You can also sprinkle some sea salt on top. The salt contrasts nicely with the sweet layers. Get creative and choose what you love most.
Gluten-Free and Vegan Options
Making these brownies gluten-free is easy. Use a gluten-free flour blend instead of all-purpose flour. This keeps the texture nice and chewy. For a vegan version, swap the eggs for flax eggs. Mix one tablespoon of flaxseed meal with two tablespoons of water. Let it sit for a few minutes to thicken. Use coconut cream instead of heavy cream for the mousse. These options keep the rich taste while fitting different diets. Enjoy these delightful treats in any way you like!
Storage Info
Best Practices for Storing Brownies and Mousse
To keep your chocolate mousse brownies fresh, store them in the fridge. Use an airtight container to avoid drying out. If you use a plate, cover it with plastic wrap. This helps keep the mousse creamy and the brownies soft. Avoid stacking the brownies, as they can get crushed.
How Long Can You Keep Chocolate Mousse Brownies?
You can keep chocolate mousse brownies in the fridge for up to five days. After this, they may lose some flavor and texture. Always check for signs of spoilage before eating. If they develop an off smell or change in texture, throw them away.
Freezing Guidelines for Future Enjoyment
You can freeze chocolate mousse brownies for up to three months. First, wrap them tightly in plastic wrap. Then, place them in a freezer bag. When ready to enjoy, thaw them overnight in the fridge. This method helps maintain their taste and texture. Avoid refreezing after thawing to keep them fresh.
FAQs
Can I make these brownies ahead of time?
Yes, you can make these brownies ahead of time. In fact, preparing them a day in advance can enhance their flavor. Just follow the recipe and chill the mousse layer as directed. Once set, cover the brownies tightly with plastic wrap. This way, they stay fresh and moist.
What’s the best way to reheat chocolate mousse brownies?
To reheat chocolate mousse brownies, use the oven. Preheat it to 350°F (175°C). Place the brownies in a safe dish. Heat for about 10 minutes. This will warm them without ruining the mousse. If you want, you can add a scoop of ice cream on top for a warm and cold treat.
Can I use different kinds of chocolate chips?
Absolutely! You can use any type of chocolate chips you like. Dark, milk, or even white chocolate chips work well. Each type gives a unique flavor. Experimenting with different chips can make your brownies exciting. Just keep the same amount to maintain the texture.
You learned how to make rich chocolate mousse brownies. We covered essential and optional ingredients, plus substitutions for special diets. I shared step-by-step tips to ensure perfect texture and flavor. You can create fun variations with new flavors and toppings. Proper storage helps keep your brownies fresh for longer. Finally, I answered common questions to support your baking journey. Get ready to impress friends and family with these delicious treat