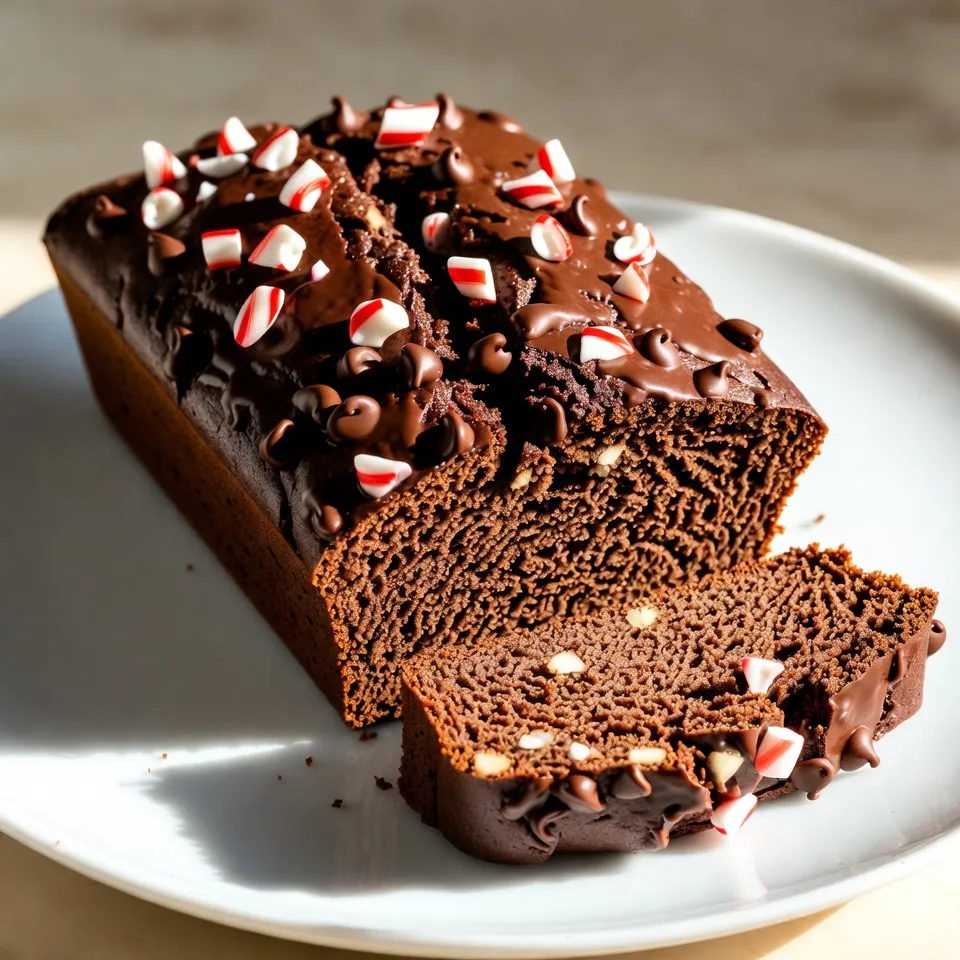
Get ready for a sweet twist on your holiday baking! Chocolate peppermint bread combines rich chocolate with a cool hint of peppermint, creating the perfect seasonal treat. In this post, I’ll guide you through each step, from selecting ingredients to mastering the baking process. Whether you’re a baking novice or an expert, you’ll find tips and tricks to make your bread a showstopper this holiday season. Let’s dive into this delightful recipe!
Why I Love This Recipe
- Festive Flavor: This bread perfectly combines rich chocolate with refreshing peppermint, making it a delightful treat for the holiday season.
- Easy to Make: The recipe is straightforward, requiring simple ingredients and minimal prep time, making it accessible for bakers of all skill levels.
- Great for Sharing: With 10 slices, this bread is perfect for gatherings, holiday parties, or as a thoughtful homemade gift for friends and family.
- Customizable: You can easily add nuts or dried fruit to the batter, or adjust the peppermint flavor to suit your taste preferences.
Ingredients
Required Ingredients
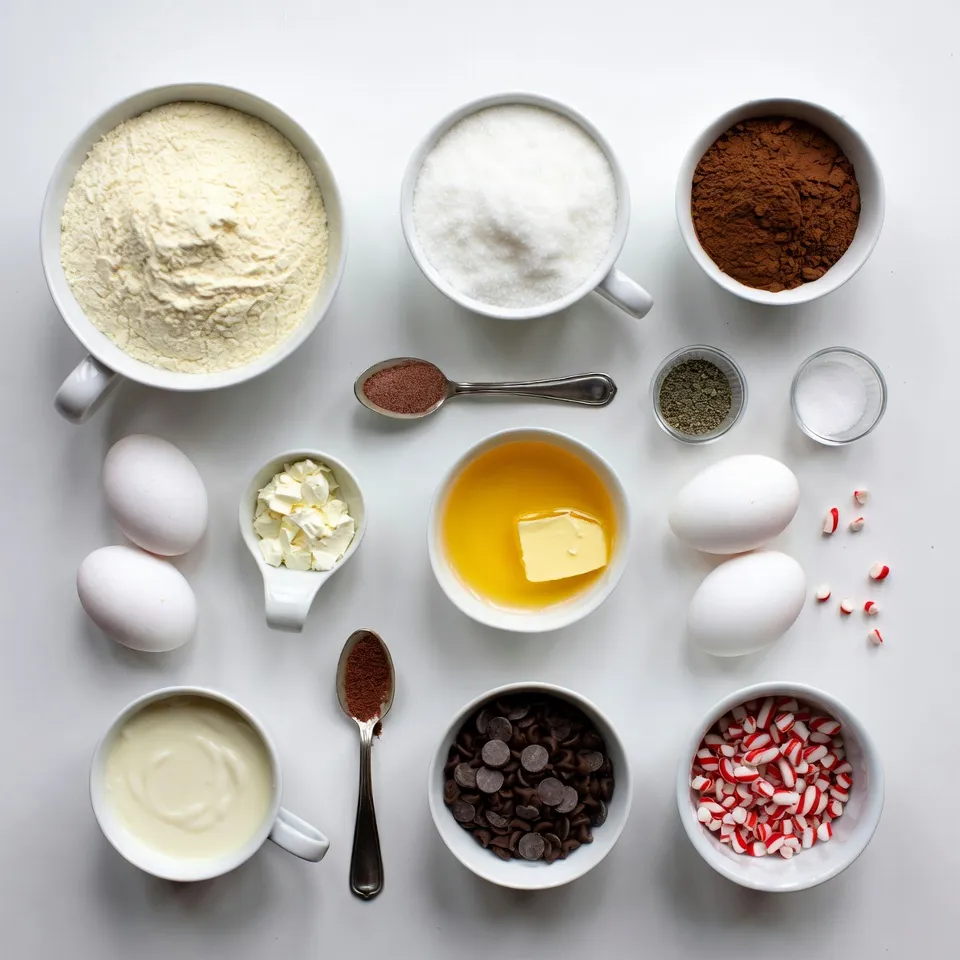
To create Chocolate Peppermint Bread, you will need the following:
– 2 cups all-purpose flour
– 1 cup granulated sugar
– 1/2 cup unsweetened cocoa powder
– 1 teaspoon baking powder
– 1/2 teaspoon baking soda
– 1/4 teaspoon salt
– 2 large eggs
– 1/2 cup unsalted butter, melted
– 1 cup buttermilk
– 1 teaspoon peppermint extract
– 1 cup semi-sweet chocolate chips
– 1/4 cup crushed candy canes (for garnish)
Each ingredient plays a key part in the bread’s success. The all-purpose flour gives structure. Sugar adds sweetness and moisture. Cocoa powder brings that rich chocolate flavor. Baking powder and baking soda help the bread rise. Eggs bind the mix and add richness. Melted butter adds moisture and flavor, while buttermilk keeps the bread soft. Peppermint extract gives that festive touch, and chocolate chips enhance the chocolate taste. Finally, crushed candy canes add a fun crunch and holiday flair.
Optional Add-ins
You can customize your Chocolate Peppermint Bread with some fun add-ins:
– Chopped nuts (like walnuts or pecans)
– Dried fruit (like cranberries or cherries)
– Additional chocolate (like white chocolate chips)
These add-ins can change the flavor and texture of your bread. Nuts give a nice crunch. Dried fruit adds a touch of sweetness and chewiness. Extra chocolate can make it richer and more indulgent. Don’t be afraid to mix and match to find your perfect blend!
Step-by-Step Instructions
Preparing the Oven and Pan
Start by preheating your oven to 350°F (175°C). This ensures even baking. While the oven heats, grease a 9×5-inch loaf pan. You can also line it with parchment paper for easy removal later. This step helps the bread come out smoothly.
Mixing the Dry Ingredients
In a large bowl, add the dry ingredients. Use 2 cups of all-purpose flour, 1 cup of granulated sugar, 1/2 cup of unsweetened cocoa powder, 1 teaspoon of baking powder, 1/2 teaspoon of baking soda, and 1/4 teaspoon of salt. Whisk these together well. Mixing them fully helps the bread rise evenly.
Combining Wet Ingredients
In another bowl, beat 2 large eggs. Then, stir in 1/2 cup of melted unsalted butter, 1 cup of buttermilk, and 1 teaspoon of peppermint extract. Mix until everything is well blended. Be gentle when adding this to the dry mix. You want to combine them without overmixing. Overmixing can make the bread tough.
Baking and Cooling
Now pour the wet mix into the dry mix. Stir gently until just combined. Next, fold in 1 cup of semi-sweet chocolate chips. Pour the batter into your prepared pan. Smooth the top with a spatula. Bake it in the preheated oven for 50-60 minutes. To check if it’s done, insert a toothpick into the center. If it comes out clean, your bread is ready.
After baking, let it cool in the pan for about 10 minutes. This helps set the bread. Then, transfer it to a wire rack to cool completely. For a festive touch, sprinkle crushed candy canes on top before serving. Enjoy every slice!
Tips & Tricks
Perfecting the Bread Texture
To make the best Chocolate Peppermint Bread, avoid overmixing. Once you combine wet and dry ingredients, mix gently. Stop as soon as you see no dry flour. Overmixing makes the bread tough.
To achieve moistness, use buttermilk. It adds richness. Melted butter also helps keep the bread soft. Make sure to measure accurately for the best results.
Enhancing Flavor
You can adjust the peppermint flavor to your taste. If you want it stronger, add more peppermint extract. Start with an extra 1/4 teaspoon. For a milder taste, use less.
High-quality chocolate makes a big difference. Choose semi-sweet or dark chocolate. It enhances the taste and gives a rich flavor. Look for chocolate with at least 60% cocoa for the best results.
Presentation Suggestions
Garnishing your bread makes it look special. After it cools, sprinkle crushed candy canes on top. This adds color and a festive touch.
You can slice the bread and serve it on a nice platter. Pair it with hot cocoa for a cozy treat. For an extra touch, drizzle melted chocolate over the top before serving. Enjoy your creation!
Pro Tips
- Use Room Temperature Ingredients: Ensure that your eggs and buttermilk are at room temperature for better mixing and a smoother batter.
- Don’t Overmix: Gently fold the wet and dry ingredients together to keep the bread light and fluffy. Overmixing can lead to a dense texture.
- Check for Doneness: Use a toothpick to test for doneness. If it comes out with a few moist crumbs, the bread is perfectly baked.
- Customize Your Toppings: Feel free to mix in different toppings like nuts or different types of chocolate chips for a personalized touch.
Variations
Alternative Flavor Combinations
You can change the flavor of Chocolate Peppermint Bread easily. Try adding vanilla extract for a warm touch. A splash of almond extract adds a nutty taste that pairs well with chocolate. You could even use orange zest for a bright twist. Each addition creates a unique flavor profile, making this bread fun to customize.
Gluten-Free and Vegan Options
Making this bread gluten-free is simple. Substitute all-purpose flour with a gluten-free flour blend. Ensure that the blend contains xanthan gum for the best texture. For a vegan option, swap eggs with flaxseed meal. Use plant-based milk instead of buttermilk, and replace butter with coconut oil. These swaps keep the bread moist and tasty.
Seasonal Variations
This bread shines in many seasons. In fall, add pumpkin spice for a cozy flavor. You can mix in cranberries for a festive touch during winter. For spring, add zest from lemons or limes for a fresh burst. These seasonal changes keep your Chocolate Peppermint Bread exciting and aligned with the holidays.
Storage Info
Best Practices for Storing
To keep your Chocolate Peppermint Bread fresh, store it in an airtight container. This method helps to prevent it from drying out. You can also wrap the bread in plastic wrap or foil. Place it in a cool, dry spot, away from direct sunlight. Storing it at room temperature is best for short-term use. If you want it to last longer, consider refrigeration. However, this may change the texture slightly.
Freezing Instructions
Freezing is a great way to extend the life of your Chocolate Peppermint Bread. First, let the bread cool completely. Wrap it tightly in plastic wrap. Then, place it in a freezer bag or airtight container. Label it with the date, so you remember when you froze it. It can last up to three months in the freezer. When ready to enjoy, just thaw it in the fridge overnight before serving.
Reheating Tips
To reheat your Chocolate Peppermint Bread, preheat your oven to 350°F (175°C). Place the slices on a baking sheet. Heat them for about 10 minutes. This will warm them up and keep them soft. You can also use a microwave. Just heat a slice for about 15-20 seconds. This method works well but may make the bread a bit chewy. Enjoy the fresh, warm taste of your holiday treat!
FAQs
What can I substitute for peppermint extract?
If you don’t have peppermint extract, you can use mint extract. It gives a nice minty taste. You can also use crushed mint leaves or peppermint oil. If you want a milder flavor, try vanilla extract. Keep in mind that the taste will change a bit.
Can I use a different type of chocolate?
Yes, you can use dark chocolate or milk chocolate. Dark chocolate will give a richer flavor. Milk chocolate is sweeter and creamier. Each type will change the bread’s taste and texture. Feel free to experiment with your favorite chocolate!
How long does Chocolate Peppermint Bread last?
Chocolate Peppermint Bread stays fresh for about 3 to 5 days at room temperature. Store it in an airtight container to keep it moist. For longer storage, place it in the fridge for up to a week. You can also freeze it for up to three months.
This Chocolate Peppermint Bread recipe offers a delightful mix of flavors. You learned about essential ingredients that make each slice special. I shared tips for enhancing texture and flavor, along with easy variations for dietary needs. With proper storage and reheating techniques, your bread stays fresh and tasty. Enjoy experimenting with this recipe and making it your own. Remember, baking is both science and art; have fun creatin