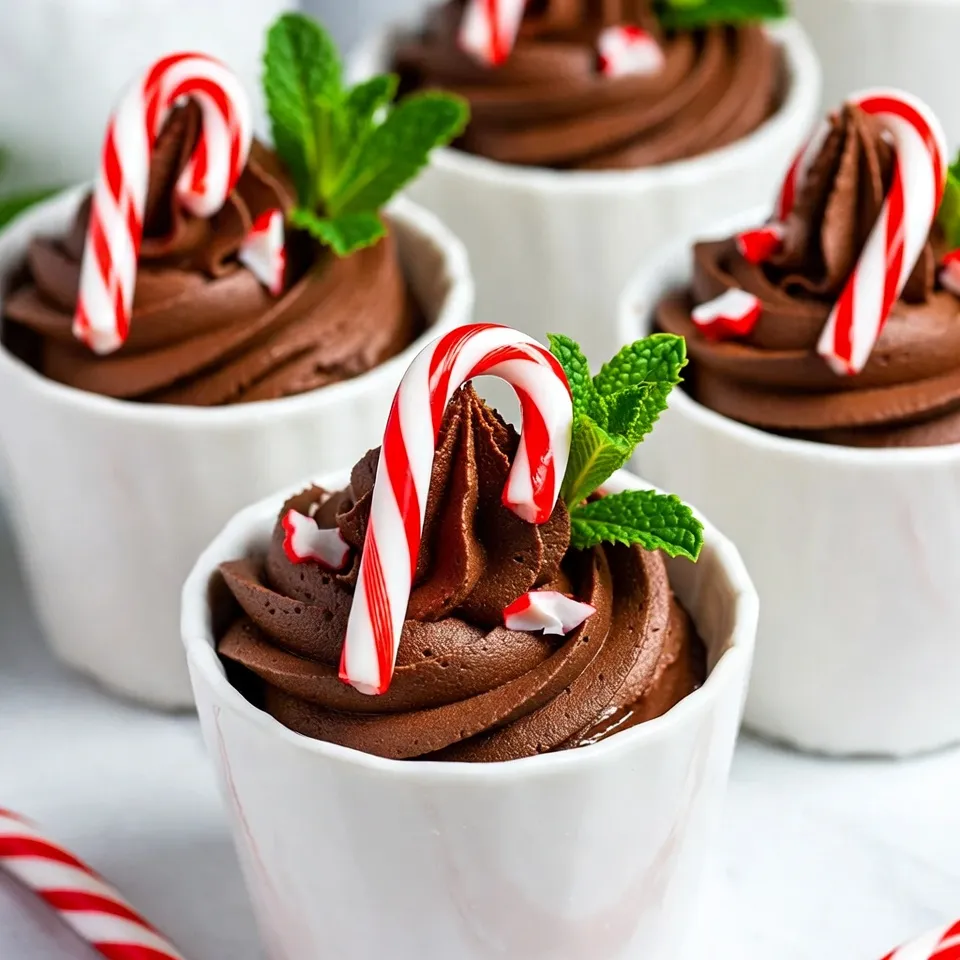
Get ready to impress your guests with Christmas Chocolate Mousse Cups! These tasty treats are the perfect festive dessert that combines rich dark chocolate and creamy texture. In this article, I’ll guide you through simple steps to create and present these delightful mousse cups. Plus, I’ll share tips, variations, and storage info to ensure your treats are a hit. Let’s dive into making your holiday celebration even sweeter!
Why I Love This Recipe
- Decadent Flavor: This chocolate mousse is rich and indulgent, making it the perfect dessert for a festive occasion.
- Easy to Make: With simple ingredients and straightforward steps, this recipe is accessible even for beginner cooks.
- Elegant Presentation: Serving the mousse in individual cups adds a touch of sophistication to your holiday table.
- Festive Garnish: The crushed candy canes and fresh mint leaves not only enhance the flavor but also add a beautiful holiday touch.
Ingredients
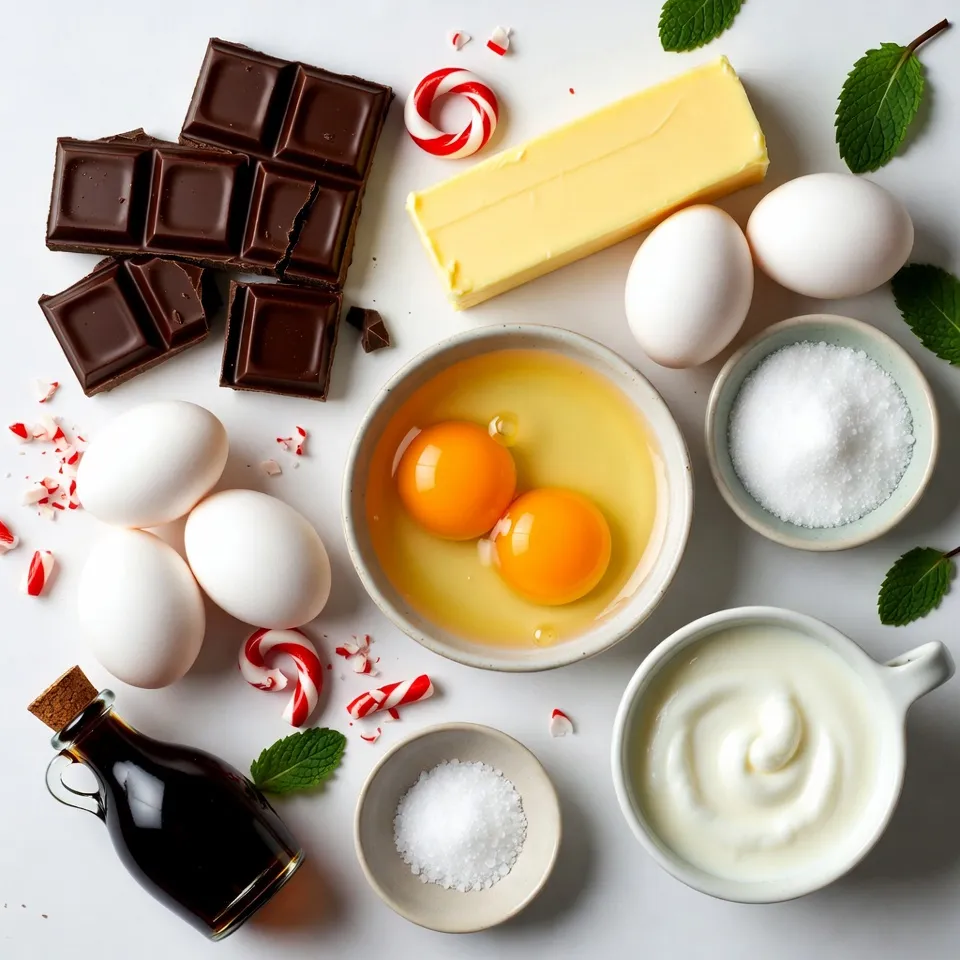
Required Ingredients
– 200g dark chocolate (70% cocoa), chopped
– 2 tablespoons unsalted butter
– 3 large eggs, separated
– 1/4 cup granulated sugar
– 1 teaspoon vanilla extract
– 1 cup heavy whipping cream
– A pinch of salt
– Mini candy canes, crushed (for garnish)
– Fresh mint leaves (for garnish)
For this Christmas Chocolate Mousse Cups recipe, you need a few simple items. Start with dark chocolate. It gives the mousse a rich flavor. Aim for chocolate that has 70% cocoa. This adds depth to your dessert.
Butter is your next ingredient. Use unsalted butter to keep the flavors balanced. It helps the chocolate melt smoothly.
Then, gather your eggs. You will use three large eggs. Separate the yolks from the whites. The yolks add creaminess, while the whites make the mousse light and airy.
Next, you need granulated sugar. It sweetens the mousse just right. Don’t forget the vanilla extract for extra flavor.
For the mousse’s fluffy texture, heavy whipping cream is a must. It adds volume and richness.
A pinch of salt rounds out the taste. It enhances all the sweet flavors in your dessert.
Finally, for garnishes, choose mini candy canes and fresh mint leaves. They add a festive touch and make your cups look lovely.
With these ingredients, your Christmas Chocolate Mousse Cups will be both festive and delicious!
Step-by-Step Instructions
Melting the Chocolate
To start, chop your dark chocolate into small pieces. You can melt it using a double boiler or a microwave. For the double boiler, fill a pot with water and let it simmer. Place a bowl on top, making sure it does not touch the water. Add the chocolate and butter into the bowl. Stir often until smooth. If using a microwave, heat the chocolate and butter in short bursts of 30 seconds. Stir in between until it melts. After melting, set it aside to cool slightly. This step ensures the chocolate stays glossy and does not cook the eggs later.
Preparing the Chocolate Mixture
Next, grab a separate bowl. Whisk together the egg yolks and sugar until the mix turns pale and creamy. This should take about 2 to 3 minutes. Now, add the melted chocolate and vanilla extract. Stir until everything is mixed well. You want a rich, shiny mixture. This chocolate base will form the heart of your mousse.
Folding Ingredients
Now, it’s time to make the mousse fluffy. In another clean bowl, beat the egg whites with a pinch of salt. Use a hand mixer or a whisk until stiff peaks form. This means the egg whites should stand tall without drooping. Gently fold the egg whites into the chocolate mixture. Use a spatula and fold slowly to keep the air in. You should not see any white streaks.
Next, whip the heavy cream until soft peaks form. This means the cream should hold its shape but not be too stiff. Carefully fold the whipped cream into the chocolate mix, too. This will give your mousse a light texture. Once combined, spoon the mousse into serving cups. Tap the cups gently on the counter to remove air bubbles.
Finally, chill the mousse in the fridge for at least 2 hours. This step allows the mousse to set and become perfect for serving.
Tips & Tricks
Achieving Perfect Texture
To get a smooth mousse, start with room-temperature eggs. Cold eggs do not mix well. They can make your mousse dense. Use a gentle folding technique when mixing the egg whites and cream. This keeps your mousse light and airy. Fold slowly to avoid deflating the mixture.
Make Ahead Tips
You can prepare the mousse a day early. Just store it in the fridge. Chill it for at least 2 hours before serving. This time allows the flavors to blend and the mousse to set. Cover the cups with plastic wrap to keep them fresh.
Presentation Ideas
For serving, use fun cups or glasses. Small mason jars work well. You can even use festive holiday mugs. For garnishes, sprinkle crushed candy canes on top. A fresh mint leaf adds color and a nice touch. Get creative!
Pro Tips
- Use Quality Chocolate: Opt for high-quality dark chocolate with at least 70% cocoa content for a richer flavor and smoother texture.
- Room Temperature Ingredients: Ensure that your eggs and cream are at room temperature; this helps achieve a better emulsion and fluffier mousse.
- Gentle Folding Technique: When incorporating the whipped cream and egg whites, use a gentle folding motion to maintain the airiness of the mixture.
- Chill for Longer: For best results, let the mousse chill for at least 4 hours or overnight; this allows the flavors to meld and the texture to firm up perfectly.
Variations
Flavor Variations
You can have fun with flavors in your chocolate mousse cups. One easy way is to add espresso. Just mix in a tablespoon of strong espresso when you combine the melted chocolate. This will give your mousse a rich coffee flavor. Another option is to add orange zest. Just a teaspoon will add a bright, fresh taste.
If you want to switch up the chocolate, try milk or white chocolate. Milk chocolate will make the mousse sweeter. White chocolate will give it a creamy texture. Both options are delicious!
Dietary Substitutions
Making your mousse vegan-friendly is simple. Use dairy-free chocolate and coconut cream instead of heavy cream. You can also replace eggs with flaxseed meal. Just mix one tablespoon of flaxseed with three tablespoons of water. Let it sit for a few minutes until it thickens.
For a gluten-free version, check your chocolate label to ensure it is gluten-free. The rest of the ingredients are naturally gluten-free, so you can enjoy this dessert without worry!
Serving Suggestions
These mousse cups pair well with other treats. They go great with fresh fruit like berries or slices of orange. You could also serve them with cookies or a slice of cake for a sweet platter.
When it comes to drinks, a nice cup of coffee or hot chocolate works well. For a festive touch, try serving them with spiced apple cider or a glass of red wine. Enjoy the flavors together for a perfect holiday treat!
Storage Info
Proper Storage Techniques
To keep your Christmas chocolate mousse cups fresh, follow these tips:
– Place the mousse cups in an airtight container.
– Store them in the fridge for best results.
– Keep them away from strong-smelling foods.
– They will stay tasty for up to three days.
Freezing Options
Yes, you can freeze chocolate mousse! It holds up well in the freezer.
– Use freezer-safe containers to prevent freezer burn.
– Freeze for up to a month.
When you’re ready to enjoy your mousse:
– Move the cups to the fridge to thaw overnight.
– Serve them chilled for the best taste and texture.
– Avoid refreezing to keep the mousse creamy and light.
FAQs
How long can Christmas Chocolate Mousse Cups be kept in the fridge?
You can keep Christmas Chocolate Mousse Cups in the fridge for up to five days. Store them in an airtight container to keep them fresh. The mousse will taste even better as it sits, allowing the flavors to blend.
Can I use different types of chocolate for the mousse?
Yes, you can use different types of chocolate. Dark, milk, or white chocolate can work well. Each type gives a unique flavor. Dark chocolate has a rich taste. Milk chocolate adds sweetness. White chocolate offers a creamy texture.
What is the best way to whip cream for mousse?
To whip cream for mousse, start with cold heavy cream. Use a chilled bowl and beaters for the best results. Whip the cream until soft peaks form. This means it holds its shape but is still smooth. Avoid overwhipping, which can make it grainy.
Can I make the mousse without raw eggs?
Yes, you can make mousse without raw eggs. Use whipped cream and melted chocolate only for a safer option. Another choice is using pasteurized eggs. They are safe to eat raw and can still give you that rich texture.
How do I prevent the mousse from becoming grainy?
To prevent graininess, melt the chocolate carefully. Make sure it is smooth before mixing. Also, fold in the whipped cream and egg whites gently. This keeps the mousse light and airy. Avoid overmixing, which can ruin the texture.
This blog post covered all you need to make delicious Christmas Chocolate Mousse Cups. We explored key ingredients, step-by-step instructions, and tips for perfect texture. You learned about flavor variations and how to store your mousse properly. Remember, with a few simple changes, you can customize this treat to fit any occasion or dietary need. Enjoy impressing your friends and family with this delightful dessert, and create lasting memories togethe