Looking for a festive treat that will spread holiday cheer? You’ve found it! This Christmas Vanilla Tree Fudge is not just delicious; it’s also simple to make. With just a few key ingredients, you can create a fun and tasty treat that impresses at any holiday gathering. Let’s dive into this easy recipe and bring joy to your holiday table!
Why I Love This Recipe
- Festive Flavor: This fudge combines the delightful flavors of vanilla and almond, enhanced with a refreshing peppermint crunch, making it perfect for the holiday season.
- Easy to Make: With just a few simple steps, anyone can whip up this delicious treat in no time, making it a great choice for holiday baking.
- Customizable: You can easily change the color with food coloring or add different toppings, allowing for a personal touch that suits your festive theme.
- Fun Presentation: Shaped like Christmas trees and topped with edible glitter, this fudge not only tastes great but also looks stunning on any holiday dessert table.
Ingredients
Main Ingredients
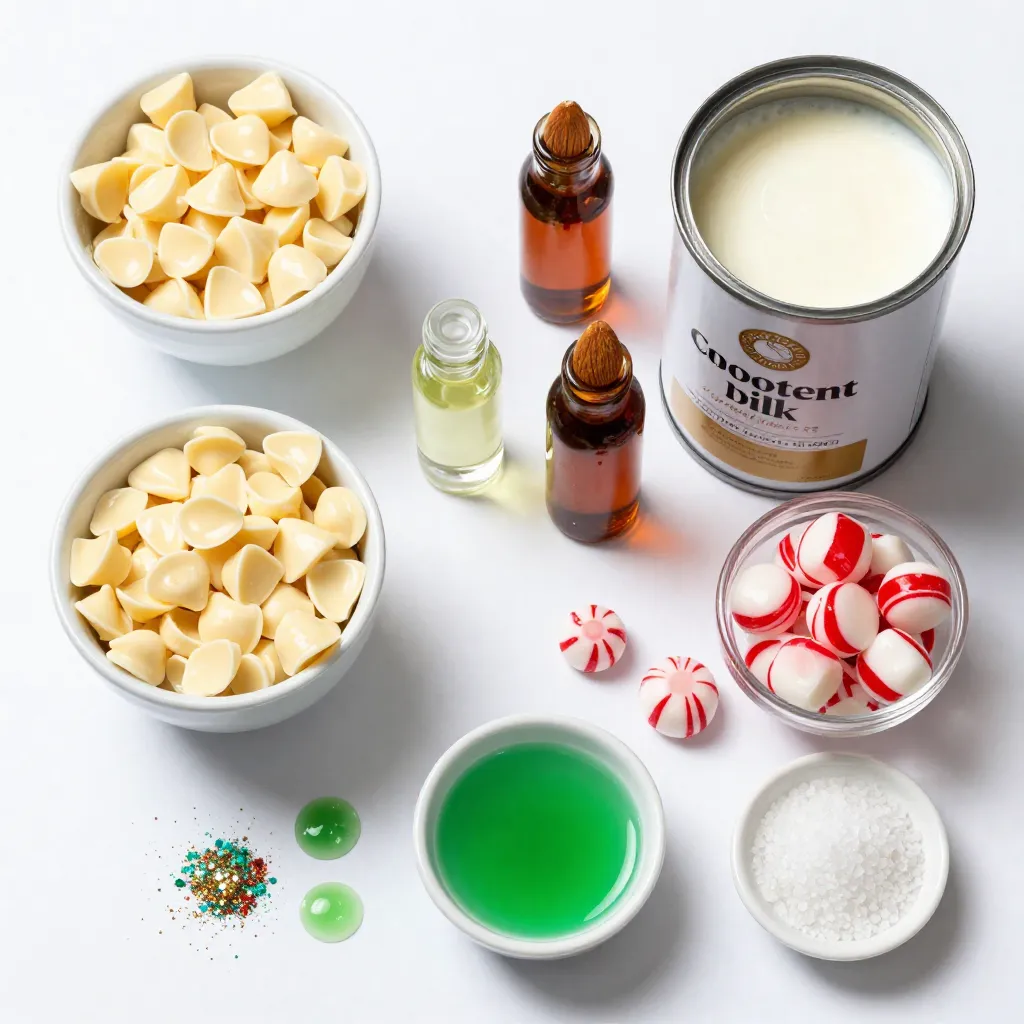
– 2 cups white chocolate chips
– 1 cup sweetened condensed milk
– 1 teaspoon vanilla extract
– 1/2 teaspoon almond extract
– 1/2 cup crushed peppermint candies
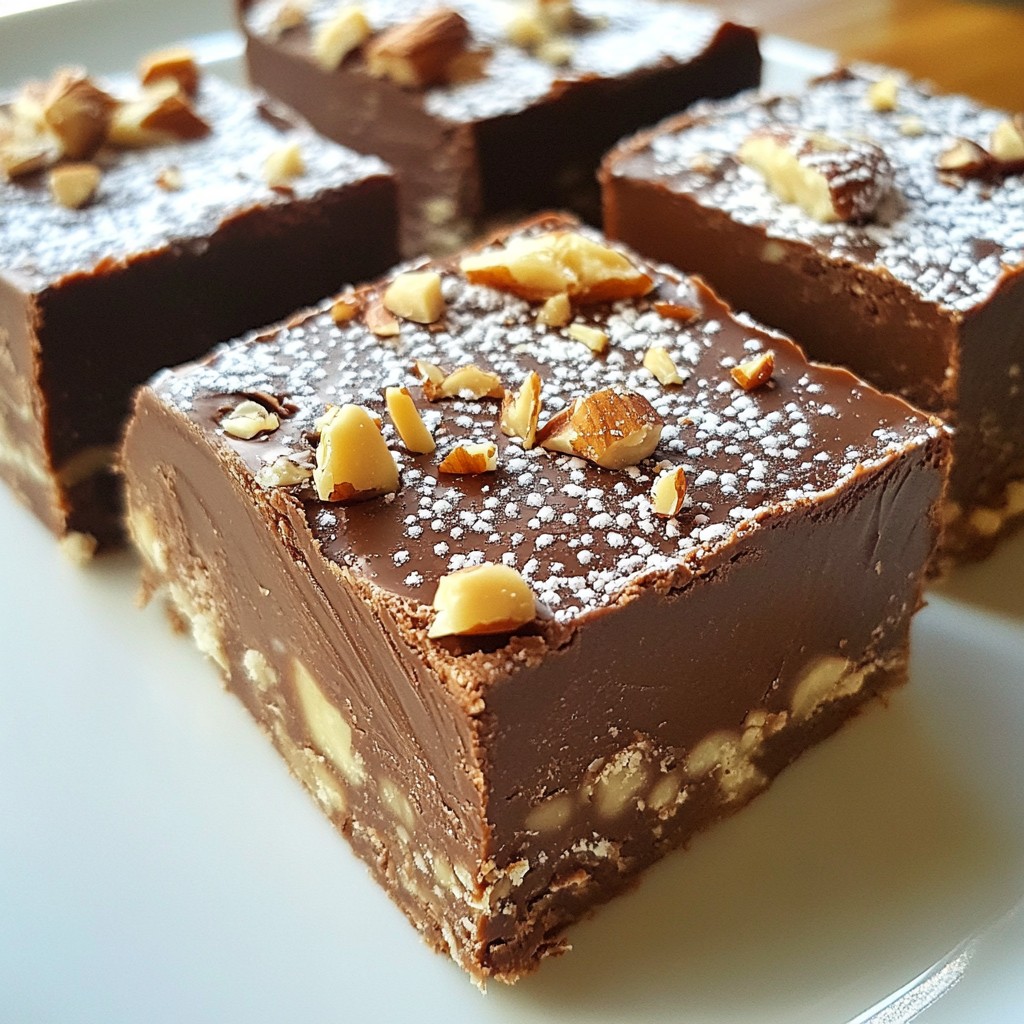
The main ingredients for this fudge create a sweet and creamy base. White chocolate chips bring a rich taste. Sweetened condensed milk adds creaminess. The vanilla and almond extracts give the fudge a lovely flavor. Finally, the crushed peppermint candies add a festive crunch.
Optional Ingredients
– Green food coloring
– Edible glitter
– Sea salt
You can make your fudge even more special with optional ingredients. Green food coloring makes it festive and fun. Edible glitter adds a sparkly touch for holiday cheer. A pinch of sea salt enhances the sweetness and balances the flavors. Use these extras to make your fudge stand out!
Step-by-Step Instructions
Preparation Steps
– Line an 8×8 inch baking dish with parchment paper.
– Set out all your ingredients before starting.
Cooking Process
– In a medium pot, melt 2 cups of white chocolate chips and 1 cup of sweetened condensed milk over low heat. Stir until smooth.
– Remove the pot from heat and stir in 1 teaspoon of vanilla extract and 1/2 teaspoon of almond extract. If you want, add a few drops of green food coloring.
– Fold in 1/2 cup of crushed peppermint candies. Make sure they mix evenly.
Final Touches
– Pour the fudge mixture into your lined baking dish. Smooth out the top with a spatula.
– Chill in the fridge for at least 2 hours until set.
– Once set, lift the fudge out using the parchment paper. Use a tree-shaped cookie cutter to cut out pieces.
– Decorate each piece with a sprinkle of edible glitter and a pinch of sea salt for that festive touch.
Tips & Tricks
Perfecting the Fudge
To make smooth fudge, start with low heat. Melt the white chocolate chips with sweetened condensed milk. Stir non-stop. This helps keep the mixture from burning. If you notice lumps, keep stirring. Once it’s smooth, take it off the heat before adding flavors.
For melting, I prefer a medium saucepan. You can also use a double boiler. If you use a microwave, heat in short bursts. Stir between each burst to avoid overheating.
Decorating Suggestions
Edible glitter adds magic to your fudge. For a sparkling touch, sprinkle it on right after cutting the fudge. You can also mix it into the fudge for a fun surprise.
For garnishes, use sea salt for a sweet and salty combo. Try crushed peppermint on top for extra flavor. You can even add tiny candy canes as a festive touch.
Gifting Tips
When packing your fudge, use clear treat bags. Add a colorful ribbon for a nice look. You can also use small boxes lined with festive paper.
Include personalized tags to make it special. Write a sweet note or include the fudge recipe. This will make your gift thoughtful and unique.
Pro Tips
- Use High-Quality Chocolate: The better the chocolate, the richer and smoother your fudge will be. Opt for premium white chocolate chips for the best flavor.
- Cool Gradually: Allow the fudge to cool at room temperature before refrigerating. This helps prevent a grainy texture and ensures a smooth finish.
- Customize Your Flavors: Feel free to experiment with different extracts like peppermint or coconut for a unique twist on your fudge.
- Storage Tips: Store your fudge in an airtight container in the refrigerator for up to two weeks to keep it fresh and delicious.
Variations
Flavor Variations
You can change the flavor of your fudge in fun ways. Try using different extracts. For example, almond extract gives a nice nutty taste. You can also use coconut or orange extract for a fresh twist.
Adding candies can make your fudge even better. Consider using chocolate chips or toffee bits. You can mix in dried fruit too, like cranberries or cherries. Each addition brings a new flavor that your friends will love.
Presentation Styles
You can get creative with how you cut and serve your fudge. Instead of just tree shapes, try stars or snowflakes. Use cookie cutters of different sizes for fun shapes.
For parties, serve the fudge on a festive platter. Place some fresh mint leaves or small ornaments around it. You can even stack the fudge pieces to create a fun display.
Dietary Modifications
Making gluten-free fudge is easy. Just check that your white chocolate chips are gluten-free. Most brands are safe, but it’s good to read the label.
If you want a vegan version, swap the white chocolate for dairy-free chips. Use coconut milk instead of sweetened condensed milk. This way, everyone can enjoy your tasty treat.
Storage Info
Proper Storage Techniques
To keep your Christmas Vanilla Tree Fudge fresh, use airtight containers. Glass or plastic containers work well. Make sure they seal tightly. Layer parchment paper between fudge pieces to avoid sticking. This helps keep the fudge neat and easy to grab.
Freezing Tips
You can freeze fudge, but do it right. Cut it into pieces first. Then, wrap each piece in plastic wrap. Place the wrapped fudge in a freezer bag. This keeps air out and prevents freezer burn. When you’re ready to enjoy it, thaw fudge in the fridge overnight. Avoid thawing at room temperature to keep the texture smooth.
Shelf Life
Fresh fudge lasts about two weeks in a cool place. Store it in the fridge for up to a month. Look for signs of spoilage, like an off smell or a dry texture. If it looks hard or crumbly, it’s time to toss it. Proper storage keeps your fudge tasty and enjoyable for longer.
FAQs
Common Questions
What can I substitute for white chocolate?
If you want to switch out white chocolate, use yogurt chips or butterscotch chips. These can give your fudge a nice twist. Remember, the flavor will change a bit, but it can be just as tasty!
Can this fudge be made ahead of time?
Yes! You can make this fudge a few days before your holiday party. Just store it in an airtight container in the fridge. It will stay fresh and ready for your guests.
Serving Suggestions
Best ways to serve chocolate fudge at Christmas
When serving fudge, cut it into fun shapes. Use tree or star cookie cutters for a festive touch. Arrange the pieces on a pretty plate. Add some holiday decorations for extra cheer!
Pairing ideas with drinks or other desserts
Fudge pairs well with hot cocoa or coffee. You can also serve it with vanilla ice cream for a sweet treat. Try adding a sprinkle of sea salt on top to enhance the flavors.
Troubleshooting Issues
What to do if fudge is too soft or sticky
If your fudge is too soft, it may need more chill time. Place it back in the fridge for a bit longer. If it’s still sticky, you can try adding some powdered sugar to firm it up.
How to repair fudge that won’t set
If your fudge won’t set, heat it gently in a saucepan. Stir in a bit more sweetened condensed milk and some more chocolate chips. Pour it back into the dish and chill it again. It should set up nicely!
In this blog post, we explored how to make delicious fudge using a few main and optional ingredients. I guided you through preparation, cooking, and decoration steps. We also shared helpful tips for perfecting your fudge and making it festive. Remember, you can create variations based on your tastes and dietary needs.
Fudge can be a fun treat or a great gift. Follow these steps to impress your friends and family with your tasty creation