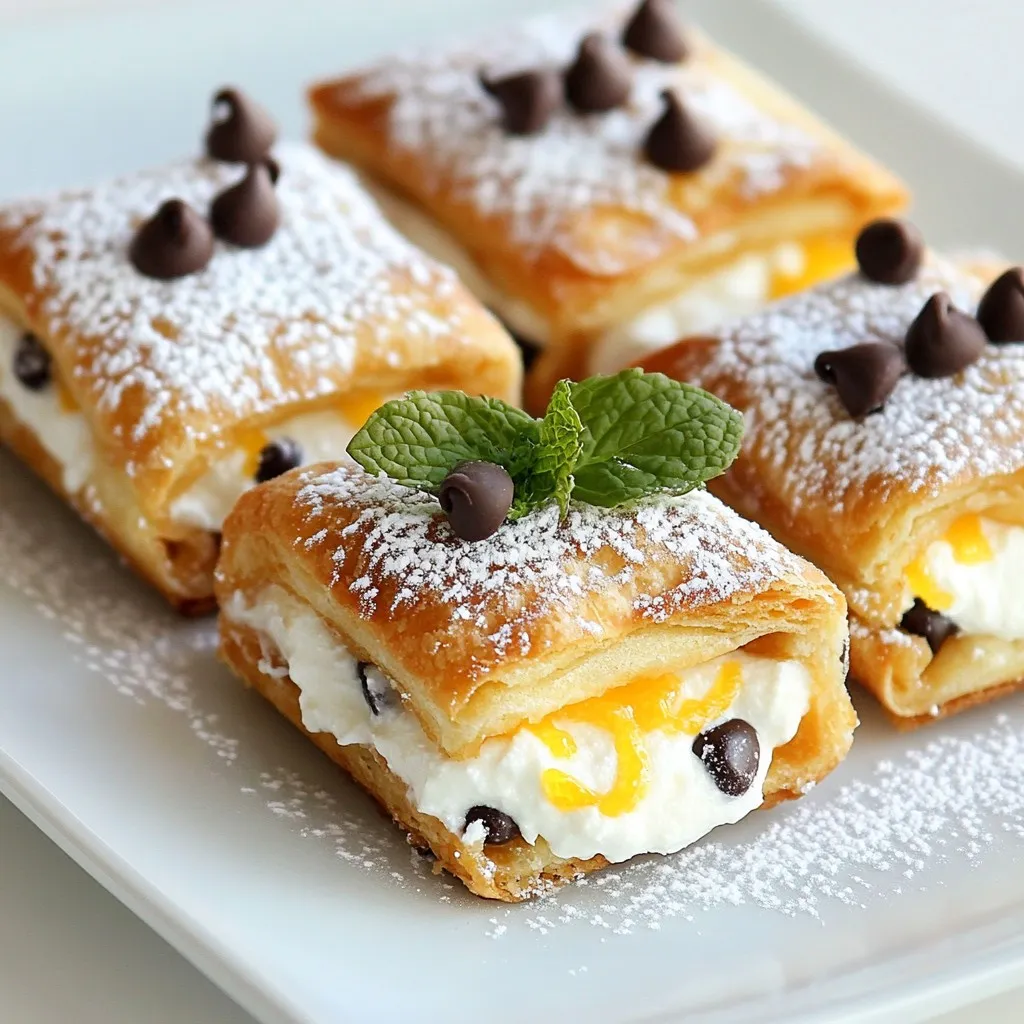
Craving a sweet, creamy treat that’s easy to make? Look no further! Classic Cannoli Squares offer all the delightful flavors of traditional cannoli without the fuss. In this simple recipe, I’ll guide you through each step, from choosing the best ingredients to whipping up a creamy ricotta filling. Get ready to impress your family and friends with this crowd-pleaser that’s sure to satisfy your sweet tooth!
Why I Love This Recipe
- Deliciously Creamy Filling: The combination of ricotta and mascarpone creates a rich, velvety texture that melts in your mouth.
- Easy to Make: Unlike traditional cannoli, these squares require no frying, making them a simpler option for home bakers.
- Perfect for Sharing: Cut them into squares, and they become an ideal dessert for gatherings, allowing everyone to enjoy a taste.
- Versatile Flavor: The addition of orange zest and chocolate chips adds a delightful twist to the classic cannoli flavor profile.
Ingredients
List of Required Ingredients
To make Classic Cannoli Squares, you need these ingredients:
– 1 cup all-purpose flour
– 1/4 cup sugar
– 1/4 cup unsalted butter, softened
– 1 large egg
– 1/2 teaspoon vanilla extract
– 1/2 teaspoon baking powder
– 1/4 teaspoon salt
– 1 cup ricotta cheese (drained)
– 1/4 cup mascarpone cheese
– 1/2 cup powdered sugar (plus extra for dusting)
– 1/2 teaspoon cinnamon
– 1/3 cup mini chocolate chips
– Zest of 1 orange
Ingredient Substitutions
If you don’t have all the ingredients, here are some swaps:
– You can use almond flour instead of all-purpose flour for a nutty flavor.
– Coconut oil works in place of unsalted butter for a dairy-free option.
– Use Greek yogurt if you lack mascarpone cheese. It adds creaminess.
– Swap mini chocolate chips with chopped nuts or dried fruit for variety.
Tips for Selecting High-Quality Ingredients
Choosing the right ingredients is key. Here’s how:
– Use fresh ricotta cheese. It should smell mild and creamy.
– Check for high-fat mascarpone cheese. It adds richness to the filling.
– Look for organic eggs. They enhance flavor and texture.
– Choose unsalted butter for better control of sweetness.
– Fresh zest from an orange makes a big difference in taste.
These tips will help you create the best cannoli squares. Enjoy the process!

Step-by-Step Instructions
Prepping Your Oven and Pan
Start by setting your oven to 350°F (175°C). This step ensures even baking. Next, grab an 8×8-inch baking pan. Grease it well with butter or cooking spray. This helps the dough come out easily after baking.
Mixing and Preparing the Dough
In a large bowl, cream together the softened butter and sugar. Mix until it looks light and fluffy. Then, add the egg, vanilla extract, baking powder, and salt. Stir until everything blends well. Gradually add the flour, mixing just until a dough forms. Don’t overmix, or the dough may get tough. Press the dough evenly into the bottom of your prepared pan. Bake for 15 minutes, or until the top turns a light golden color. Let the crust cool in the pan for a few minutes.
Creating the Ricotta Filling
In another bowl, combine the drained ricotta cheese and mascarpone cheese. Add the powdered sugar, cinnamon, mini chocolate chips, and orange zest. Mix until the filling is smooth and creamy. This filling is rich and adds a great flavor to the dessert.
Assembling and Chilling the Cannoli Squares
Spread the ricotta mixture evenly over the cooled crust. Make sure to cover all areas for even flavor. Once you spread it out, place the pan in the refrigerator. Chill for at least one hour. This helps the filling set properly. Finally, cut the chilled squares into pieces. Dust them with extra powdered sugar before serving. Enjoy these delightful treats!
Tips & Tricks
How to Achieve the Perfect Dough Texture
To get great dough, use cold butter. Cold butter helps create a nice texture. Cream the butter and sugar until fluffy, but don’t overmix. When adding flour, mix just until combined. This keeps the dough light. Press the dough evenly into the pan. It should be smooth and not too thick. Bake until it turns golden but does not overbake.
Serving Suggestions for Cannoli Squares
These squares look great on any table. Serve them chilled for the best taste. I love to dust them with powdered sugar just before serving. You can add fresh mint leaves for color. Mini chocolate chips on top add a fun touch. For drinks, serve with coffee or sweet dessert wine. This pairing enhances the sweet flavor of the squares.
Common Mistakes to Avoid
One common mistake is overmixing the dough. This makes it tough. Another mistake is not chilling the filling. Chilling helps it set well. Avoid using wet ricotta; always drain it first. This keeps the filling from being too runny. Lastly, don’t skip the orange zest. It adds a very nice flavor that you won’t want to miss.
Pro Tips
- Chill the Filling: After spreading the ricotta mixture over the crust, make sure to chill it for at least an hour. This helps the filling to firm up and makes it easier to cut into squares.
- Use Fresh Ingredients: For the best flavor, ensure your ricotta and mascarpone cheese are fresh. This will enhance the overall taste of your cannoli squares.
- Don’t Skip the Zest: Incorporating orange zest not only adds a delightful flavor but also brightens up the filling. Make sure to use a microplane for fine zesting.
- Dust Before Serving: For an elegant presentation, dust the squares with powdered sugar just before serving. This gives them a beautiful, finished look.
Variations
Alternate Flavors for the Filling
You can change the filling to fit your taste. Instead of orange zest, try lemon zest. This adds a bright, fresh flavor. You can also swap out the mini chocolate chips for chopped pistachios. They give a nice crunch and a nutty taste. For a unique twist, add a splash of almond extract. This adds a lovely depth to the filling. You can experiment with different spices too. A hint of nutmeg can give a warm flavor. Remember, the goal is to have fun and enjoy your creation!
Gluten-Free Version
Making gluten-free cannoli squares is easy. Just replace all-purpose flour with gluten-free flour. Look for a blend that works well in baking. You can also use almond flour for a different taste. When using gluten-free flour, check the texture of the dough. It should be soft but not sticky. The rest of the recipe stays the same. You can still enjoy the creamy filling with no worries. Everyone can enjoy these treats, gluten-free or not!
Making Mini Cannoli Squares
Mini cannoli squares are perfect for parties or small bites. To make them, use a smaller pan, like a 6×6-inch one. This will create smaller squares that are easy to grab. Follow the same steps for the dough and filling. Just watch the baking time. You might need to bake them for a few less minutes. Once chilled, cut them into tiny squares. You can even top them with tiny chocolate chips or fresh fruit. These mini treats are sure to please any crowd!
Storage Info
How to Store Cannoli Squares
To keep your cannoli squares fresh, place them in an airtight container. This helps prevent them from drying out. You can stack the squares with parchment paper in between. This keeps them from sticking together. Store the container in the refrigerator. This will maintain their creamy filling.
Freezing Instructions for Leftovers
If you have leftovers, freezing is a great option. First, cut the squares into pieces. Wrap each piece in plastic wrap. Then, place them in a freezer-safe bag. Label the bag with the date. You can freeze the squares for up to three months. When you’re ready to eat, thaw them in the fridge overnight.
Shelf Life of Cannoli Squares
Cannoli squares stay fresh for about three days in the fridge. After that, the filling may start to change in texture. If you freeze them, they can last up to three months. Always check for any signs of spoilage before enjoying. If they look or smell off, it’s best to toss them.
FAQs
What is the origin of cannoli squares?
Cannoli squares come from Italy. They are a twist on the classic cannoli. Traditional cannoli are tube-shaped pastries filled with sweet ricotta. The square form makes them easier to serve. This dessert keeps the rich flavors while being simple to make. They are popular for parties and gatherings.
Can I make cannoli squares ahead of time?
Yes, you can make cannoli squares ahead of time. They taste even better after chilling. Prepare them a day in advance for best results. Just store them in the fridge until ready to serve. This gives the flavors time to blend beautifully.
What can I use instead of mascarpone cheese?
If you do not have mascarpone cheese, use cream cheese. Blend it with a little heavy cream for a similar texture. You can also mix ricotta cheese with sour cream. This will give you a creamy and tangy flavor.
How can I make the filling more flavorful?
To boost flavor, add more zest from oranges or lemons. You can also mix in vanilla extract or almond extract. Try adding chopped nuts like pistachios or walnuts. A splash of coffee or espresso can create a rich taste. You can even mix in a bit of your favorite liqueur, like Amaretto.
In this guide, we covered everything you need to know about making cannoli squares. You learned about the key ingredients, their substitutes, and how to choose the best quality. We walked through the steps for creating the dough and ricotta filling. You also gained tips on texture, serving, and avoiding mistakes.
Now, you’re ready to create your own delicious treats. Enjoy experimenting with flavors and variations. Happy bakin