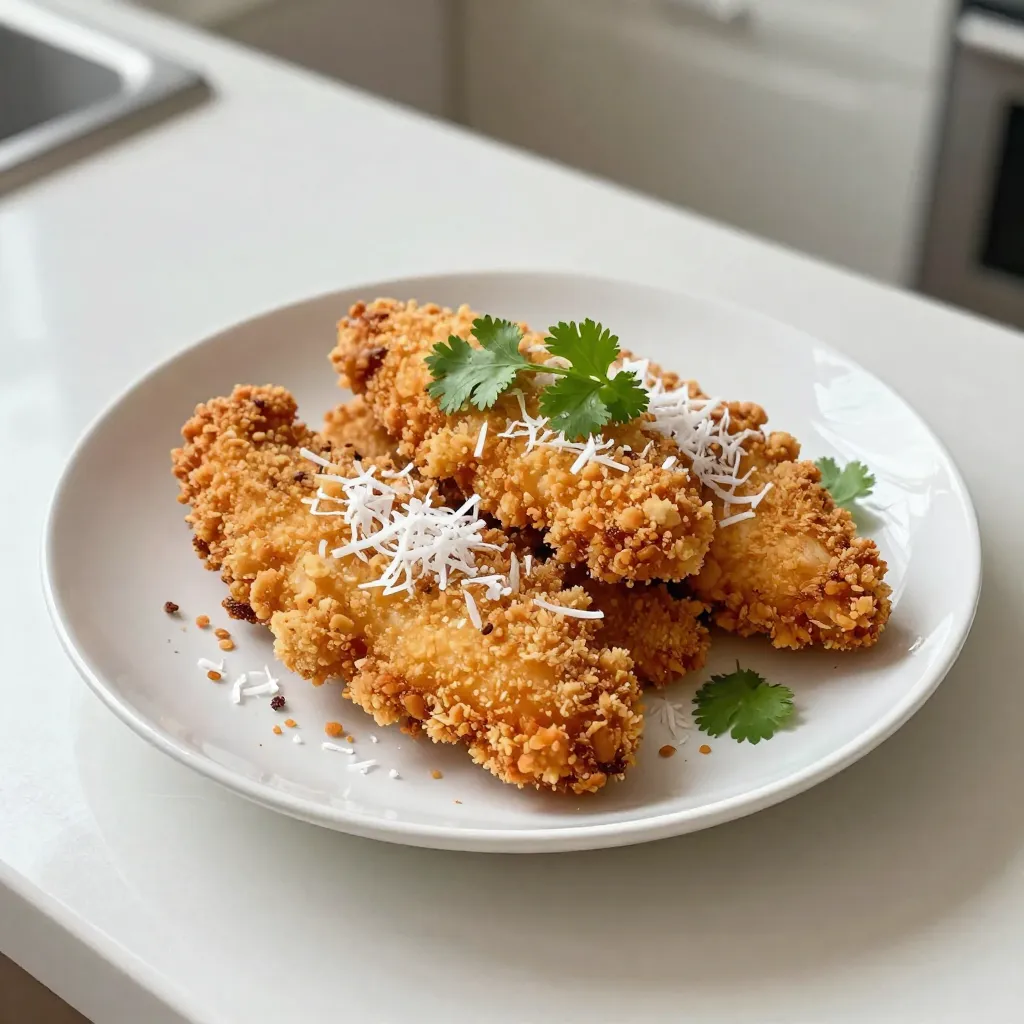
Are you ready to make dinner exciting? Coconut Crunch Chicken is a quick and tasty way to impress your family! With a crispy coating and rich coconut flavor, this recipe is a crowd-pleaser. In this post, I’ll guide you through the simple steps to create a dish that’s both easy to make and full of flavor. Let’s dive into the ingredients and get started on your new favorite meal!
Why I Love This Recipe
- Deliciously Crunchy: The combination of shredded coconut and panko breadcrumbs creates a crispy and flavorful coating that is simply irresistible.
- Quick and Easy: This recipe can be prepared in just 30 minutes, making it perfect for busy weeknights or last-minute gatherings.
- Versatile Flavor: The subtle sweetness of coconut pairs wonderfully with a variety of sides, from tropical salsas to fresh salads.
- Healthy Option: Using boneless, skinless chicken breasts and coconut oil gives you a healthier alternative to traditional fried chicken.
Ingredients
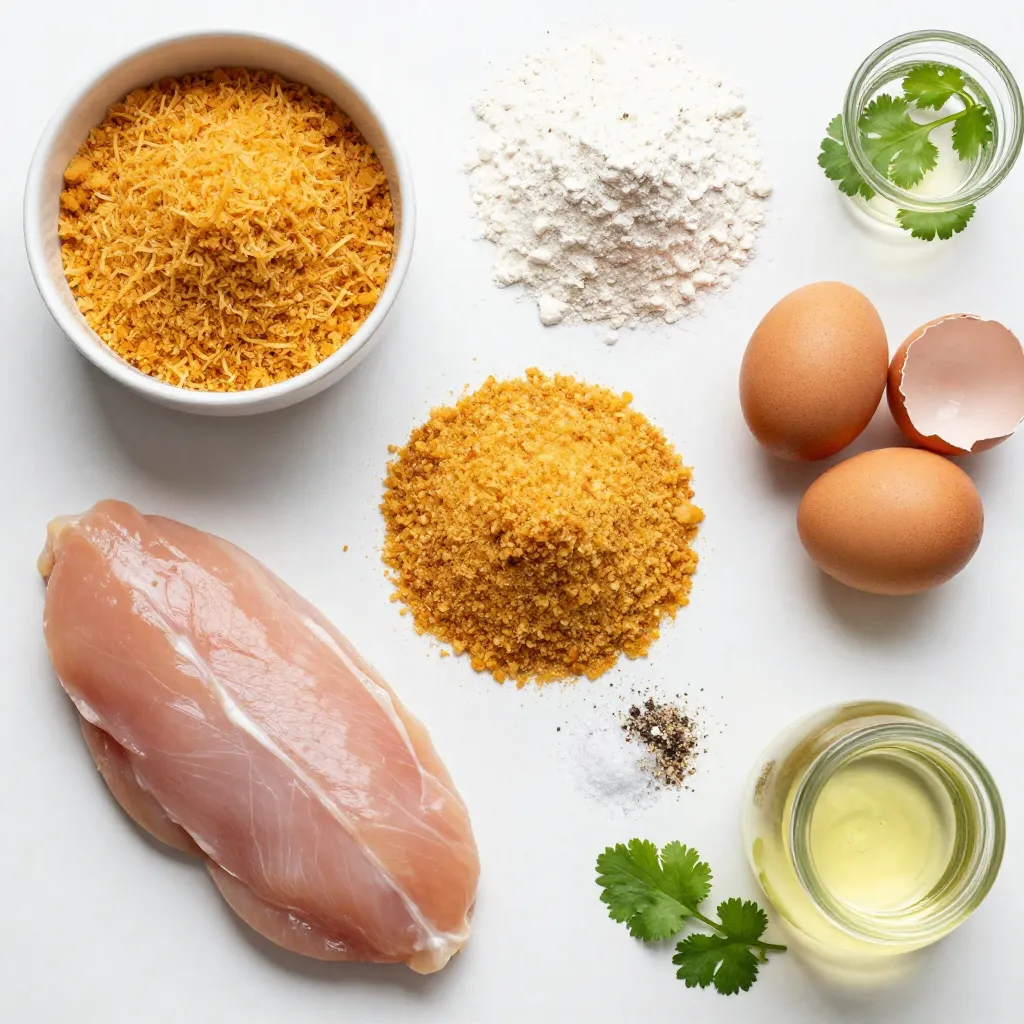
Main Ingredients for Coconut Crunch Chicken
To make Coconut Crunch Chicken, you need a few key items:
– 4 boneless, skinless chicken breasts
– 1 cup unsweetened shredded coconut
– 1 cup panko breadcrumbs
– 1/2 cup all-purpose flour
– 2 large eggs
These main ingredients bring together the flavors and textures we love. The chicken gives a juicy base. The coconut adds a sweet crunch. The panko makes it extra crispy.
Seasonings and Coating
For the perfect seasoning, use:
– 1 teaspoon garlic powder
– 1 teaspoon onion powder
– Salt and pepper to taste
These seasonings really boost the taste. They mix well in the flour to coat the chicken. This step adds flavor at every bite, making the chicken exciting to eat.
Cooking Oil Options
For frying, I recommend using:
– 1/2 cup coconut oil
Coconut oil gives a unique flavor that matches the coconut in the dish. It also helps create a nice crisp on the outside. You can use vegetable oil if you prefer, but coconut oil brings that special touch.
Step-by-Step Instructions
Preparing the Coating
To start, gather three bowls. In the first bowl, mix the flour, garlic powder, onion powder, salt, and pepper. This mix adds great flavor to the chicken. In the second bowl, beat the two eggs until smooth. In the third bowl, combine the shredded coconut and panko breadcrumbs. This mix gives a nice crunch.
Coating the Chicken Breasts
Now, take each chicken breast. First, dip it into the flour mix. Make sure to shake off the extra flour. Next, dip the chicken into the beaten eggs. Let any excess egg drip off. Finally, press the chicken into the coconut and panko mix. Make sure the chicken is fully coated on all sides. This step is key for that crunchy texture.
Cooking the Chicken
Heat the coconut oil in a large skillet over medium heat. Wait until the oil shimmers, indicating it is hot. Place the coated chicken breasts in the hot oil carefully. Don’t overcrowd the pan; this helps them cook evenly. Cook for about 5-7 minutes on each side. Look for a golden brown color and an internal temperature of 165°F or 74°C. If you need to, cook the chicken in batches. After cooking, transfer the chicken to a plate lined with paper towels to drain excess oil.
Tips & Tricks
Achieving the Perfect Crunch
To get that great crunch, use both shredded coconut and panko breadcrumbs. The coconut gives a nice flavor, while panko adds a crispy texture. Make sure to press the chicken into the coating firmly. This helps it stick well when you fry it. Fry in hot coconut oil, and you’ll hear a nice sizzle. This sound is a good sign that your chicken will be crunchy.
Ensuring Even Cooking
Cook the chicken in batches. If you overcrowd the pan, the oil cools down. This means the chicken won’t cook evenly. Aim for a golden brown color. Use a meat thermometer to check the thick part of the chicken. It should reach 165°F or 74°C. This ensures your chicken is safe to eat and juicy.
Substituting Ingredients for Different Flavors
You can change the flavors by swapping some ingredients. Try adding spices like paprika or cayenne pepper to the flour mix for a kick. You could also use almond flour instead of regular flour for a nutty taste. If you want to skip the coconut, use crushed cornflakes for a different crunch. The key is to have fun and taste as you go!
Pro Tips
- Perfect Oil Temperature: Ensure the coconut oil is hot enough before adding the chicken to achieve a crispy coating. It should shimmer but not smoke.
- Don’t Overcrowd the Pan: Fry the chicken in batches if necessary. Overcrowding can lower the oil’s temperature and result in soggy chicken.
- Use Fresh Ingredients: Fresh coconut and quality panko breadcrumbs will enhance the flavor and texture of the dish significantly.
- Let It Rest: After frying, allow the chicken to rest for a few minutes before serving. This helps retain its juices and keeps it tender.
Variations
Coconut Crunch Chicken with Spices
You can spice up your Coconut Crunch Chicken easily. Add flavors to the flour mix. Try adding a teaspoon of cayenne pepper for heat. You can also use paprika for a smoky taste. If you want a fresh kick, add lime zest. This makes the dish bright and exciting. Adjust the spice to make it your own.
Baked Version of Coconut Crunch Chicken
If you prefer a healthier option, try baking the chicken. Preheat your oven to 400°F (200°C). After coating your chicken, place it on a baking sheet lined with parchment paper. Spray the top with a bit of cooking spray. Bake for 20-25 minutes until golden and crispy. This method keeps the chicken tender and cuts down on oil.
Gluten-Free Coconut Crunch Chicken
To make this dish gluten-free, swap regular flour with almond or coconut flour. Use gluten-free panko breadcrumbs for the crunch. Check the labels on all ingredients to avoid hidden gluten. The flavor will still shine through. This option lets everyone enjoy the dish without worry.
Storage Info
How to Store Leftovers
After you finish your meal, let the chicken cool down. Place any leftovers in an airtight container. Store the chicken in the fridge for up to three days. Make sure it is well sealed to keep it fresh. If you want to save it longer, consider freezing.
Reheating Coconut Crunch Chicken
When you’re ready to eat the leftovers, you can reheat them easily. Preheat your oven to 350°F (175°C). Place the chicken on a baking sheet. Heat for about 10-15 minutes until warm. This method keeps the crust crunchy. You can also use a microwave, but it may not stay crispy.
Freezing Tips for Meal Prep
If you want to freeze the chicken, do this before cooking. Place the coated chicken in a single layer on a baking sheet. Freeze it for about an hour until firm. Then transfer it to a freezer bag. Label the bag with the date. You can freeze it for up to three months. To cook, thaw in the fridge overnight and fry as usual.
FAQs
What can I serve with Coconut Crunch Chicken?
You can serve Coconut Crunch Chicken with many tasty sides. I love pairing it with mango salsa. The sweet, tangy flavors of the mango balance the chicken’s crunch. A fresh green salad also works great. It adds a nice crunch and brightens the meal. You might consider serving it with rice or quinoa, too. These grains soak up the flavors well.
How long does Coconut Crunch Chicken last in the fridge?
Coconut Crunch Chicken lasts about three to four days in the fridge. Make sure to store it in an airtight container. This helps keep it fresh and tasty. If you want to keep it longer, consider freezing it. Just wrap it tightly in foil or freezer bags. It will last up to three months in the freezer.
Can I use boneless skinless thighs instead of breasts?
Yes, you can use boneless skinless thighs instead of breasts. They are juicier and add more flavor. Just make sure to adjust the cooking time. Thighs may take a bit longer to cook. Always check the internal temperature to ensure it’s safe. It should reach 165°F or 74°C.
Coconut Crunch Chicken offers a delightful mix of textures and flavors. We explored main ingredients, warming seasonings, and cooking oils to make this dish shine. I shared steps for coating and cooking your chicken perfectly. With tips for extra crunch and even cooking, you can adapt this recipe to fit your taste. I also provided smart storage ideas for leftovers.
Try different variations like baked or gluten-free options to suit your needs. This dish is easy and fun; enjoy trying it out with your own twis