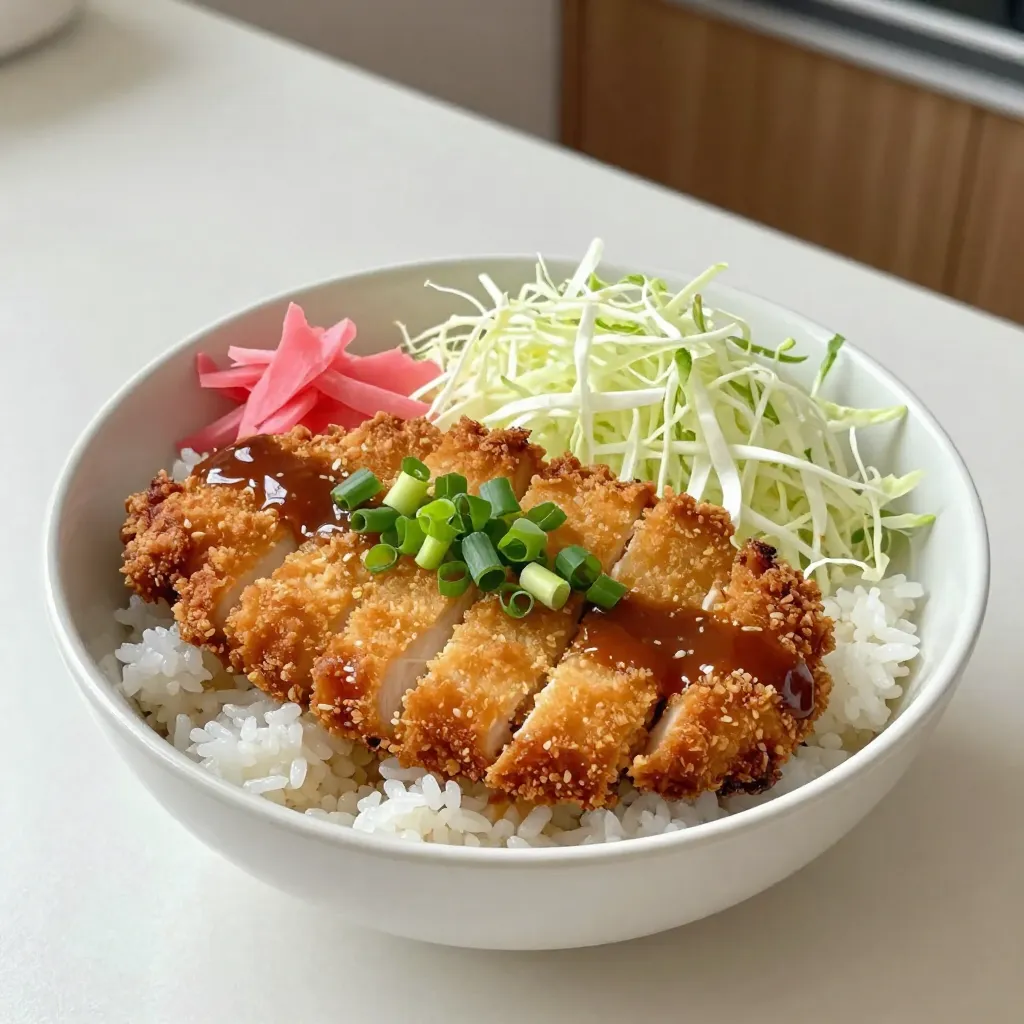
Looking for a tasty meal that’s simple to make? Crispy Chicken Katsu Bowls offer a delightful mix of flavors and textures. With juicy chicken thighs coated in crunchy panko, paired with fluffy rice and fresh cabbage, this dish has it all. I’ll share my step-by-step guide and tips to perfect your own katsu bowls. Let’s dive into this delicious journey and make dinner something special!
Why I Love This Recipe
- Deliciously Crunchy: The panko breadcrumbs create a wonderfully crispy texture that contrasts beautifully with the tender chicken inside.
- Quick and Easy: This recipe can be prepared in about 30 minutes, making it perfect for a weeknight dinner.
- Customizable Bowls: Feel free to add your favorite toppings or adjust the ingredients to suit your taste, making it versatile for everyone.
- Comfort Food Vibes: The combination of crispy chicken, rice, and savory katsu sauce is truly comforting and satisfying.
Ingredients
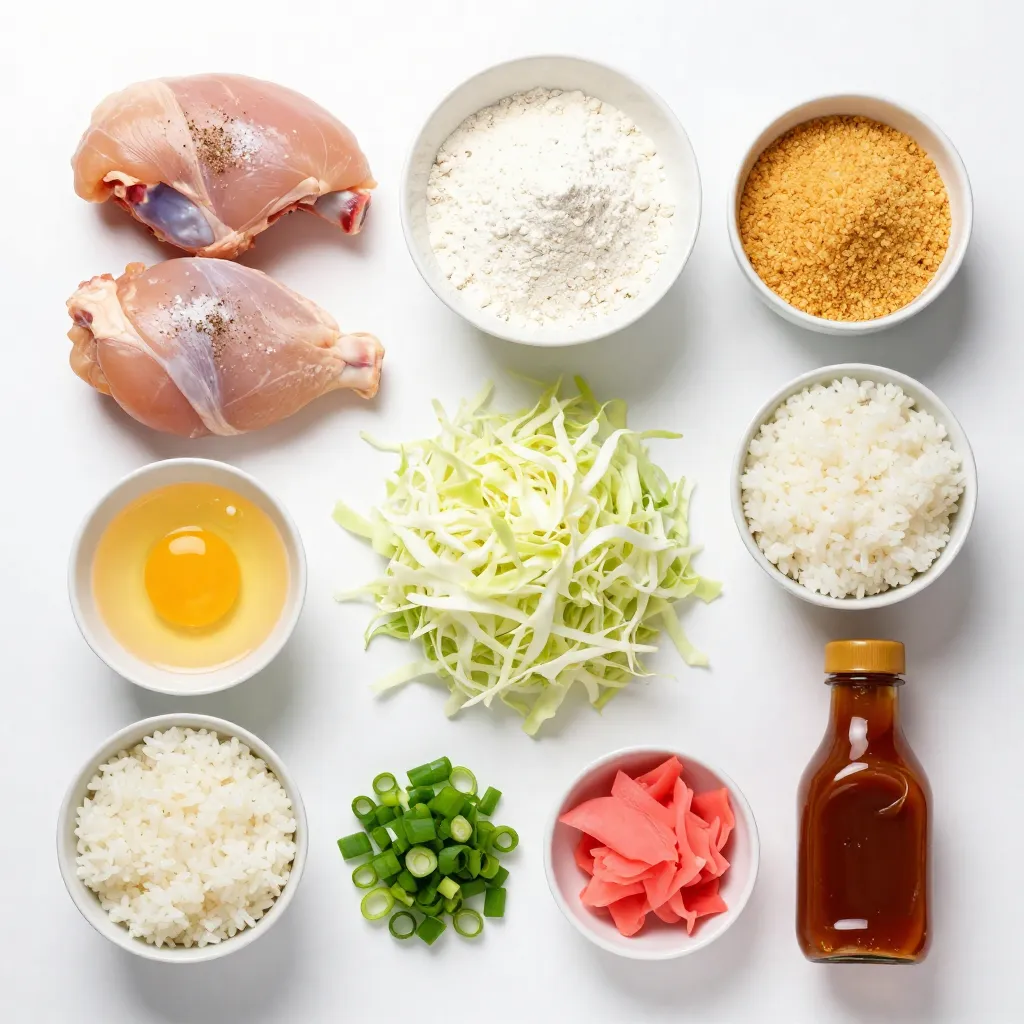
Main Ingredients Needed
– 2 boneless, skinless chicken thighs
– Salt and pepper, to taste
– 1/2 cup all-purpose flour
– 1 large egg, beaten
– 1 cup panko breadcrumbs
– Vegetable oil, for frying
– 2 cups cooked Japanese short-grain rice
– 1 cup shredded cabbage
– 1/4 cup sliced green onions
– 1/4 cup pickled ginger (for garnish)
– 1/4 cup katsu sauce (store-bought or homemade)
To make a great chicken katsu bowl, you need some key ingredients. Chicken thighs work best because they are juicy. Panko breadcrumbs make your chicken crispy. Japanese short-grain rice gives a nice base. You will also want fresh cabbage, green onions, and pickled ginger for extra flavor.
Cooking Essentials
– Large skillet for frying
– Meat mallet for pounding chicken
– Three shallow dishes for breading
– Paper towels for draining excess oil
For this recipe, you need a few important tools. A large skillet is best for frying the chicken. A meat mallet helps you pound the chicken to the right thickness. Use three shallow dishes for your breading station: one for flour, one for the egg, and one for panko.
Possible Substitutes
– Chicken breast for a leaner option
– Tofu for a vegetarian version
– Gluten-free breadcrumbs as an alternative
If you want to switch things up, use chicken breast instead of thighs for a leaner dish. You can also use tofu for a tasty vegetarian option. If you need gluten-free choices, look for gluten-free breadcrumbs. This way, everyone can enjoy a crispy chicken katsu bowl!
Step-by-Step Instructions
Preparing the Chicken
To start, you need to pound the chicken thighs. This makes the chicken tender and helps it cook evenly. Place each thigh between two pieces of plastic wrap. Use a meat mallet to pound until they are about 1/2 inch thick.
Next, season the chicken. Sprinkle salt and pepper on both sides. This adds flavor to each bite.
Setting Up the Breading Station
Now, let’s set up a breading station. You will need three shallow dishes.
1. First dish: Fill it with 1/2 cup of all-purpose flour.
2. Second dish: Beat one large egg and pour it in.
3. Third dish: Pour in 1 cup of panko breadcrumbs.
This three-dish method helps you coat the chicken well. Each step is important. The flour helps the egg stick. The egg helps the breadcrumbs adhere better, creating a crunchy coating.
Frying the Chicken
Frying is where the magic happens. Heat about 1/2 inch of vegetable oil in a large skillet. You want the oil hot, around 350°F or 175°C. This temperature makes the chicken crispy and golden.
Carefully add the breaded chicken thighs. Fry them for about 4-5 minutes on each side. Make sure to watch them closely. Once they are golden brown, drain them on paper towels. This helps remove excess oil, keeping the chicken crispy.
Assembling the Bowls
Now, let’s put it all together. In each bowl, add 2 cups of cooked Japanese short-grain rice. This rice is sticky and holds flavors well.
Next, slice the crispy chicken into strips and place them on top of the rice. Add a generous handful of shredded cabbage. This adds crunch and freshness. Finish with a sprinkle of sliced green onions.
For the final touch, drizzle 1/4 cup of katsu sauce over the chicken. Add pickled ginger as a garnish for a nice pop of color and flavor.
Remember, presentation matters! Arrange everything neatly. You can even drizzle extra katsu sauce around the bowl for a beautiful look. Enjoy your crispy chicken katsu bowls!
Tips & Tricks
Perfecting the Crispy Texture
To get crispy chicken katsu, follow these tips:
– Frying Techniques: Make sure your oil is hot enough, around 350°F (175°C). If it’s too cool, the chicken absorbs more oil and gets soggy. Always fry in small batches to keep the oil hot.
– Panko vs. Regular Breadcrumbs: Use panko breadcrumbs for extra crunch. Panko has larger flakes that create air pockets, leading to a crispier texture. Regular breadcrumbs don’t give the same result.
Enhancing Flavor
To make your katsu even tastier, consider these options:
– Marinating Options: Marinate chicken thighs for 30 minutes in soy sauce, garlic, or ginger. This adds deeper flavor.
– Sauces and Seasonings Recommendations: Katsu sauce is a must. For a twist, try a spicy mayo or teriyaki sauce. A sprinkle of sesame seeds can also boost flavor.
Storage Tips for Leftovers
If you have leftovers, store them properly to keep them tasty:
– Best Practices for Storing Fried Chicken: Let the chicken cool before placing it in an airtight container. Store it in the fridge for up to three days.
– Reheating Methods to Maintain Crispiness: Reheat chicken in an oven at 350°F (175°C) for about 10 minutes. This helps keep the skin crispy. Avoid microwaving, as it makes the chicken soggy.
Pro Tips
- Perfect Pounding: Ensure the chicken is evenly pounded to 1/2 inch thickness for consistent cooking and to achieve that desired crispy texture.
- Oil Temperature Matters: Use a thermometer to check the oil temperature; frying at the right temperature (around 350°F or 175°C) is crucial for crispy chicken without being greasy.
- Rest Before Slicing: Allow the fried chicken to rest for a few minutes before slicing. This helps retain its juices and keeps the meat tender.
- Custom Katsu Sauce: For a unique twist, try mixing in a little honey or sriracha to store-bought katsu sauce for added sweetness or heat.
Variations
Alternative Bowls
You can switch up the protein in chicken katsu. Try using pork or shrimp for a tasty twist. For a vegetarian or vegan option, use tofu or eggplant. Just bread and fry them like chicken. They will soak up that katsu sauce and taste amazing.
Side Dish Pairings
Katsu bowls shine when you add tasty sides. Serve with a fresh salad or miso soup. You can also try steamed veggies for a healthy touch. Homemade pickles can add a nice crunch. To make simple pickles, slice cucumbers and soak them in vinegar, sugar, and salt. Let them sit for an hour. They will taste fresh and bright.
Regional Twists
Different cuisines can inspire your katsu bowls. For example, use curry spices for a Thai twist. You can also try a spicy Korean gochujang sauce instead of katsu sauce. Each option brings a unique flavor and keeps your meals exciting. Don’t hesitate to explore and mix flavors!
Storage Info
Tips for Storing Chicken Katsu
To keep your chicken katsu fresh, follow these simple steps. First, let the chicken cool down. Place it in an airtight container. This helps avoid moisture loss. You can store it in the fridge for up to three days. If you want to keep it longer, freezing is a great option. Wrap the chicken tightly in plastic wrap and then foil. This keeps the chicken safe from freezer burn. You can freeze it for up to three months.
How Long Does It Last?
When stored correctly, your crispy chicken katsu can last. In the fridge, it lasts about three days. In the freezer, it can last for up to three months. Always check for signs of spoilage. If it smells off or has a slimy texture, it’s best to throw it away. When reheating, make sure it’s hot throughout to ensure safety.
Reheating Instructions
To reheat chicken katsu, you have a few options. The oven is a great choice. Preheat it to 375°F (190°C). Place the chicken on a baking sheet and heat for about 10-15 minutes. This method keeps it crispy. You can also use a skillet. Heat a small amount of oil over medium heat. Cook the chicken for a few minutes on each side until hot. Avoid using the microwave if you want to keep it crispy.
FAQs
What is Chicken Katsu?
Chicken katsu is a Japanese dish. It features breaded and fried chicken. The name “katsu” comes from “katsuretsu,” which means cutlet. Traditionally, chefs use chicken breasts, but I prefer thighs for their juiciness. This dish is often served with rice and cabbage. Katsu can also be made with pork or eggplant. Each type has its own flavor, but the cooking method stays the same. Chicken katsu is crunchy outside and tender inside.
Can I make this recipe gluten-free?
Yes, you can easily make this recipe gluten-free. For flour, use rice flour or a gluten-free blend. Instead of regular panko, use gluten-free breadcrumbs. They provide a similar crunch. Check the label to ensure they are certified gluten-free. You can also use crushed cornflakes as a crunchy option. These swaps keep your chicken katsu delicious and safe for gluten-sensitive diets.
How do I make my chicken katsu less greasy?
To reduce grease, use a few simple tips. First, make sure the oil is hot enough before frying. Aim for 350°F or 175°C. This helps the chicken cook fast, creating a crispy crust. You can also try baking or air frying. For baking, set your oven to 400°F (200°C) and place the chicken on a wire rack. This allows air to circulate and keep the chicken crispy. Air frying also gives you a crunch without much oil.
This guide covers everything you need to make great chicken katsu. You learned about ingredients, cooking steps, and tips for the perfect crispy dish. Remember to customize with your favorite flavors and sides. Whether frying or storing, staying mindful of techniques ensures each meal is tasty. Now, whip up a bowl that impresses your friends or family. With these tips, you can enjoy delicious chicken katsu whenever you like. Let’s get cookin