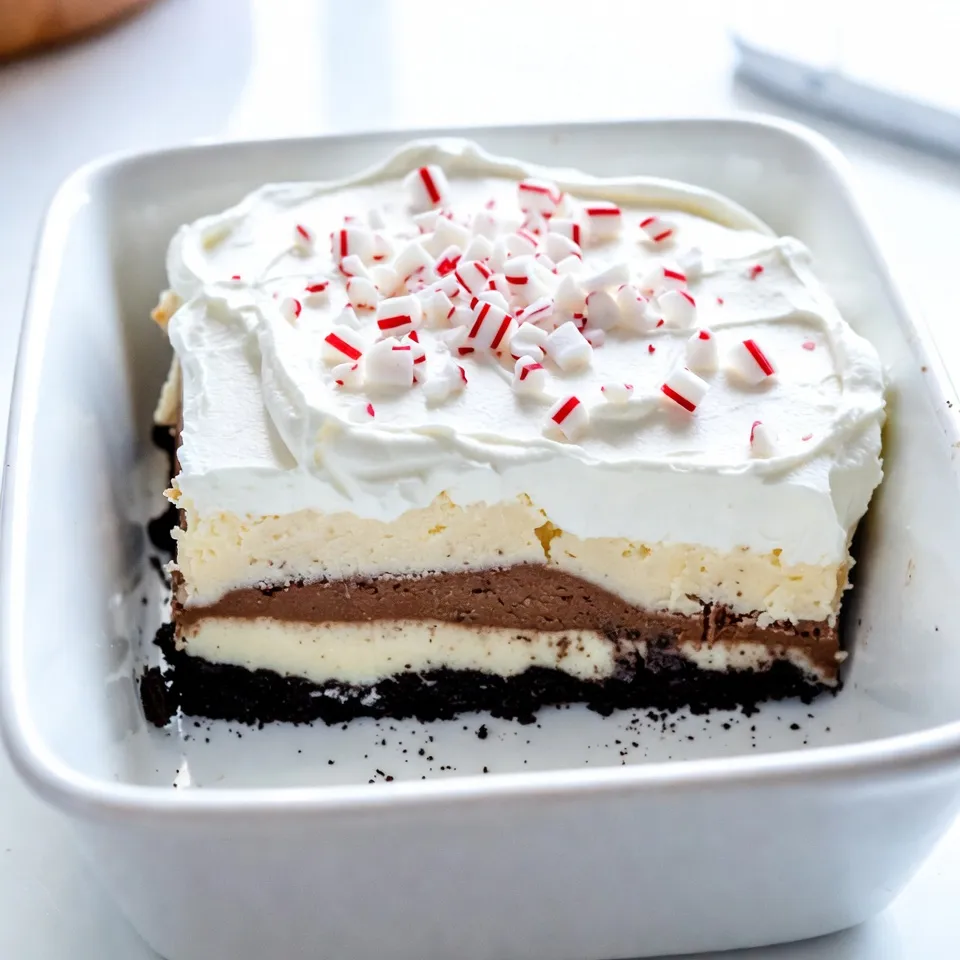
Looking for a festive dessert that’s easy and delightful? You’ve come to the right place! My No-Bake Christmas Oreo Lasagna combines the rich flavors of chocolate and cream cheese in layered perfection. With just a few simple ingredients, you can whip up this show-stopping treat that will impress your family and friends. Ready to create a delicious holiday dessert? Let’s dive into the recipe!
Why I Love This Recipe
- Decadent Layers: This dessert features creamy layers of pudding and rich cream cheese, making every bite a delightful experience.
- No Baking Required: With no need for an oven, this recipe is perfect for busy days, allowing you to whip up a delicious treat with ease.
- Festive Touch: The addition of crushed peppermint candies adds a wonderful holiday flair and a burst of flavor to each serving.
- Make Ahead: This lasagna can be prepared in advance, making it an ideal dessert for holiday gatherings and parties.
Ingredients
To create your No-Bake Christmas Oreo Lasagna, gather these simple ingredients:
– 2 packs of Oreo cookies (about 36 cookies)
– 1/2 cup unsalted butter, melted
– 2 cups cream cheese, softened
– 1 cup powdered sugar
– 2 cups cool whip (whipped topping)
– 1 teaspoon vanilla extract
– 1 cup milk
– 1 box (3.9 oz) instant chocolate pudding mix
– 1 box (3.9 oz) instant vanilla pudding mix
– 1/2 cup crushed peppermint candies (for garnish)
Having all these items ready makes the cooking fun. The Oreo cookies form a rich, crunchy base. Cream cheese adds a smooth texture. The cool whip gives a light and fluffy feel. The pudding mixes bring that sweet flavor. Finally, crushed peppermint candies add a festive touch. Trust me, these ingredients come together to create a dessert everyone will love.

Step-by-Step Instructions
Preparing the Oreo Crust
First, grab your food processor. Add the Oreo cookies and crush them into fine crumbs. This is where the fun begins! Next, pour the melted butter into the bowl with the crumbs. Mix them well until you have a sandy texture. Now, take a 9×13 inch baking dish and firmly press the crumb mixture into the bottom. This will be your tasty crust.
Making the Cream Cheese Layer
In a mixing bowl, add the softened cream cheese and powdered sugar. Beat them together until smooth and creamy. This step is crucial for a rich flavor! Now, gently fold in one cup of cool whip. This makes the layer light and fluffy. Spread this delicious mixture evenly over your crust.
Preparing the Pudding Layers
Now it’s time to make the puddings. In two separate bowls, follow the package instructions for the chocolate pudding mix. Use two cups of milk for each flavor. Once they thicken, start layering! First, pour the chocolate pudding over the cream cheese layer. Then, add the vanilla pudding on top.
Adding the Final Topping
You are almost there! Take the remaining cool whip and spread it over the pudding layers. Use a spatula to smooth it out evenly. This will give your lasagna a lovely finish.
Chilling the Lasagna
Cover your dish with plastic wrap. This keeps everything fresh. Place it in the fridge for at least four hours. This chilling time is key for the layers to set properly.
Garnish and Serve
Before serving, sprinkle some crushed peppermint candies on top. This adds a festive touch! Slice into squares and serve. Enjoy every delicious bite of your no-bake Christmas Oreo lasagna!
Tips & Tricks
Best Practices for Layering
To make your No-Bake Christmas Oreo Lasagna shine, focus on even layers. Start with the crust. Press the Oreo mixture tightly into the dish. This gives a solid base.
Next, spread the cream cheese layer. Use a spatula to smooth it out. The spatula helps keep the layer even and neat. When adding the pudding layers, pour slowly. This way, you avoid mixing the layers together.
Make-Ahead Tips
You can prepare this dessert a day in advance. Follow all the steps, then chill it overnight. This allows the flavors to blend well. For the best taste, serve it cold after chilling for at least four hours.
Customization Ideas
Feel free to swap some ingredients. For a chocolate twist, use all chocolate pudding. You can also mix in crushed cookies for added crunch.
If you want a fruity flavor, try adding fresh strawberries or bananas between the layers. You can also use different flavored pudding mixes like butterscotch or banana.
Pro Tips
- Use a Food Processor: Crushing the Oreo cookies in a food processor will give you a finer crumb, which helps create a more cohesive crust.
- Chill the Layers: Allowing each layer to chill for a short time before adding the next helps to keep the layers distinct and prevents them from mixing together.
- Experiment with Flavors: Feel free to mix and match different pudding flavors, such as caramel or butterscotch, for a unique twist on this dessert.
- Garnish Just Before Serving: Adding the crushed peppermint candies right before serving ensures they stay crunchy and add a delightful texture to your dessert.
Variations
Chocolate Lovers Version
If you love chocolate, this version is for you. You can use only chocolate pudding. This makes the dish rich and extra chocolatey. To add more fun, sprinkle in chocolate chips as a layer. These chips add texture and a burst of flavor.
Peppermint Chocolate Version
Want a festive twist? Incorporate peppermint extract to the cream cheese layer. This gives a nice minty kick. You can also use peppermint-flavored pudding instead of vanilla. This version is perfect for the holiday season.
Fruit-Infused Variation
Adding fresh fruits can brighten up this dessert. Layer in strawberries or bananas for a fresh taste. Berries like raspberries or blueberries work great too. They add color and a sweet-tart flavor. Choose fruits that you enjoy for the best results.
Storage Info
How to Store Leftovers
To keep your leftover No-Bake Christmas Oreo Lasagna fresh, use an airtight container. Glass containers work great. They keep the layers nice and prevent any odors from mixing. You can store it in the fridge for up to five days. Always cover it tightly to maintain its taste and texture.
Freezing Tips
Yes, this dessert can be frozen! If you want to save some for later, freeze it in a sealed container. Cut it into portions first for easy serving. To thaw, move it to the fridge for several hours or overnight. Avoid thawing at room temperature to keep the texture nice.
Signs of Spoilage
Check for changes in smell or texture. If it smells sour or looks watery, it may be bad. Mold is a clear sign to throw it away. If the layers start to separate, it’s best to discard the dessert. Always trust your senses when it comes to food safety.
FAQs
Can I use reduced-fat cream cheese?
Yes, you can use reduced-fat cream cheese. However, it may change the texture. The filling might be less creamy and a bit denser. If you want the same taste and texture, stick with full-fat cream cheese.
How long does the no-bake lasagna need to set?
I recommend chilling the lasagna for at least 4 hours. This time lets the layers firm up. For the best results, chill it overnight. It gives the flavors time to meld beautifully.
Can I substitute regular Oreos with gluten-free Oreos?
Absolutely! Using gluten-free Oreos works well. The taste will be similar, and the texture should remain just right. It’s a great swap for those who need to avoid gluten.
How can I make this recipe dairy-free?
To make this dish dairy-free, use dairy-free cream cheese. You can also swap butter with coconut oil or dairy-free margarine. For whipped topping, look for a dairy-free version. These changes keep the dish creamy and delicious.
This dessert is simple and fun to make. We covered essential ingredients and step-by-step instructions for Oreo lasagna. You learned how to create smooth layers and tips for customizing. Don’t forget to chill it well for the best taste. With these easy points in mind, you can enjoy or share this delicious treat. Get creative with flavors and toppings. This Oreo lasagna will impress everyone and keep them coming back for more. Enjoy making your versio