Ready to whip up some festive fun? These No-Bake Christmas Reindeer Treats are simple and sure to delight everyone. With just a few ingredients, you’ll create cute, delicious snacks that bring joy to your holiday celebrations. Join me as I guide you through easy steps to make these adorable treats, perfect for gatherings or cozy nights at home. Let’s get started on a sweet holiday adventure!
Why I Love This Recipe
- Fun and Festive: These treats are not only delicious but also bring a playful holiday spirit to any gathering.
- No-Bake Convenience: Perfect for busy holiday schedules, these reindeer treats come together quickly without the need for baking.
- Customizable: You can easily modify the decorations to match your festive theme, making each batch unique.
- Kid-Friendly: This is a fun activity to do with kids, allowing them to help shape and decorate their own reindeer treats!
Ingredients
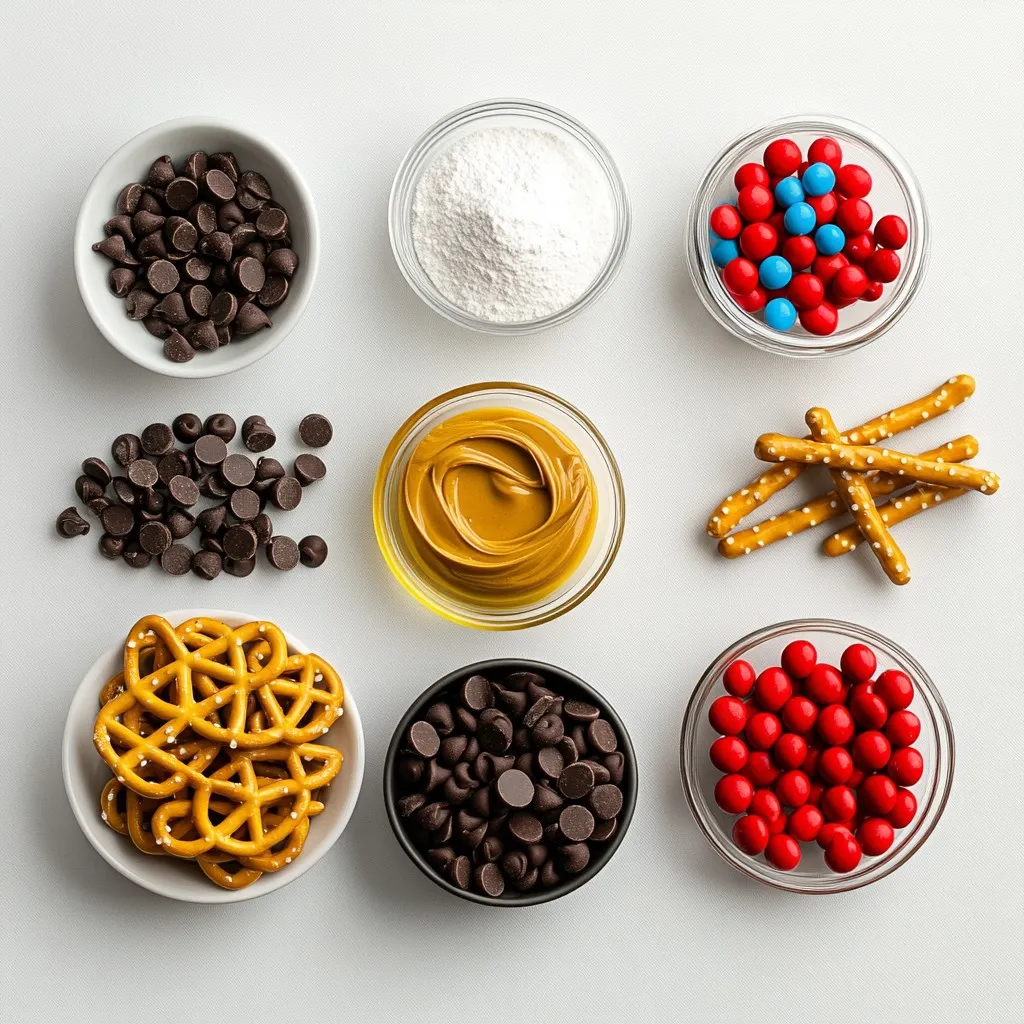
List of Ingredients Needed
– 2 cups of chocolate sandwich cookies (crushed)
– 1 cup of creamy peanut butter
– ½ cup of powdered sugar
– 1 cup of chocolate chips (for melting)
– 16 pretzel twists (for antlers)
– 16 candy eyes
– 16 red M&M’s (for noses)
– 1 tablespoon of vegetable oil (for melting chocolate)
Gather all these ingredients to make your reindeer treats. Start with the chocolate sandwich cookies. Crush them well to form a fine crumb. Mix the crushed cookies with creamy peanut butter and powdered sugar. This creates a sweet and tasty base.
Next, you’ll need chocolate chips. These will melt down to coat your reindeer. Add a tablespoon of vegetable oil when melting the chocolate. The oil helps keep the chocolate smooth.
Don’t forget the fun decorations! Pretzel twists make great antlers. Candy eyes will give your reindeer personality. Lastly, use red M&M’s for the noses to add a festive touch.
With these ingredients, you’re ready to create a fun holiday treat. The blend of flavors and textures will make these reindeer a hit at any gathering!
Step-by-Step Instructions
Preparation of the Cookie Mixture
– In a large mixing bowl, combine 2 cups of crushed chocolate sandwich cookies, 1 cup of creamy peanut butter, and ½ cup of powdered sugar.
– Mix these ingredients well until they form a dough-like consistency. It should feel like playdough but a bit stickier.
– Scoop out a tablespoon of the mixture and shape it into balls, about 1-inch in diameter. This recipe makes about 16 balls.
Chilling the Cookie Balls
– Refrigeration is key to firming up the cookie balls. It helps them hold their shape when coated in chocolate.
– Place the cookie balls on a baking sheet lined with parchment paper and chill them for about 30 minutes.
Melting the Chocolate
– For melting chocolate, use a microwave-safe bowl. Add 1 cup of chocolate chips and 1 tablespoon of vegetable oil to help the chocolate stay smooth.
– Heat in 30-second intervals. Stir after each interval until the chocolate is fully melted and smooth.
Coating and Decorating
– Remove the chilled cookie balls from the fridge. Dip each ball into the melted chocolate, ensuring it is fully coated.
– Place them back on the parchment paper. While the chocolate is still wet, gently press two pretzel twists into the top of each ball for antlers.
– Add two candy eyes on each treat and finish with a red M&M for the nose.
– Let the chocolate set completely at room temperature or refrigerate them for quicker firming.
Tips & Tricks
How to Shape the Balls Evenly
To shape the balls evenly, use measuring spoons. This helps you scoop out the same amount each time. It makes your treats look neat and fun. If your hands get sticky, keep them wet. A little water will help the mixture slide right off your hands. This simple tip keeps everything clean and easy.
Ensuring Chocolate Coating Stays Smooth
To keep your chocolate coating smooth, watch the temperature while melting. Heat the chocolate in short bursts, like 30 seconds at a time. Stir it after each time to check the smoothness. Avoid overheating the chocolate. If it gets too hot, it may clump up or burn. A gentle touch makes a big difference.
Creative Decoration Ideas
Get creative with your decorations! You can use different candies or toppings to change things up. Try mini marshmallows or colored sprinkles for fun effects. Think about themes, too. Use red and green for Christmas or pastel colors for spring. Let your imagination run wild, and make your treats a hit!
Pro Tips
- Chill for Best Results: Make sure to refrigerate the cookie balls for at least 30 minutes before dipping in chocolate. This will help them hold their shape better.
- Melt with Care: When melting chocolate, do it in short intervals and stir often to prevent burning. Adding a tablespoon of vegetable oil will help achieve a smooth consistency.
- Customize Your Treats: Feel free to use different types of chocolate or add sprinkles on top before the chocolate sets for a festive touch!
- Perfect Presentation: Display your reindeer treats on a decorative platter and surround them with holiday-themed decorations to enhance the festive spirit.
Variations
Alternate Flavor Ingredients
You can change the flavors in your No-Bake Christmas Reindeer Treats. Try using different cookie types. Vanilla cookies add a sweet twist. Peppermint cookies give a fresh taste. You can also switch out peanut butter for almond butter. This change gives a nutty flavor. Both options work well with chocolate.
Themed Reindeer Variations
Get creative with your decorations! Use colorful sprinkles or edible glitter for a festive look. You can also change the theme for other holidays. Use pastel colors for Easter or red, white, and blue for the Fourth of July. These simple changes make your treats unique and fun for any occasion. Let your imagination run wild!
FAQs
Can I make No-Bake Christmas Reindeer Treats ahead of time?
Yes, you can make these treats a day in advance. Store them in an airtight container in the fridge. This keeps them fresh and ready for your holiday fun. Making them early saves time on busy days.
What substitutions can I make for allergy-friendly versions?
You can swap peanut butter for sun butter or almond butter. Use gluten-free cookies if needed. For dairy-free options, select dairy-free chocolate chips. Always check labels to ensure they meet your needs.
How can I make these treats look more festive?
To boost the holiday spirit, add colorful sprinkles around the treats. You can also use white chocolate for a snowy look. Consider using themed candies like green M&M’s for a fun twist.
Can I freeze No-Bake Christmas Reindeer Treats?
Yes, you can freeze these treats. Place them in a single layer in a container. Separate layers with parchment paper to prevent sticking. When you’re ready to enjoy, thaw them in the fridge for a few hours.
You’ve learned how to make fun No-Bake Christmas Reindeer Treats. We covered the ingredients you need, step-by-step instructions, and clever tips. Try different flavors and decorate for any holiday. Store these treats well to keep them fresh. Making these treats can be a fun activity for everyone. You’ll impress family and friends with your tasty creations. Enjoy the smiles you bring this season with your delicious treat